
I started with a green wax cylinder with an off center hole down the middle called a "blank". Using a tiny coping saw called a jeweler's saw, I cut off a 7mm wide piece that you can see in the background. My first cut was so crooked, that I had to cut a 2nd. In the picture above you can see the millimeter gauge, the compass for scoring the wax, the dremel tool, and some circle templates.

At the end of the first session with the wax, I was able to file off about 1-2mm or so. You can see the difference and my sketch of the ring on the right. I took the previous two pix with my camera phone, so the images are kind of crap.
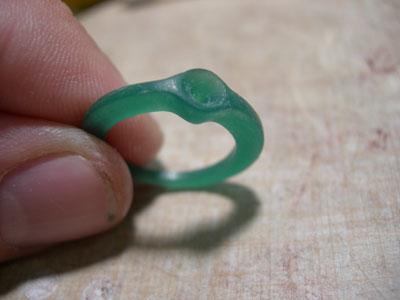
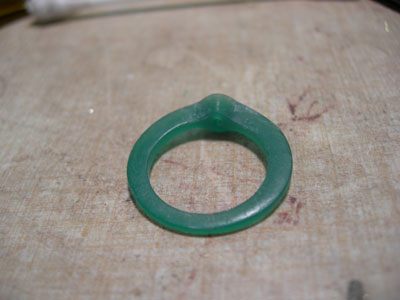
Using a wax file I was able to carve the wax into the shape I wanted. I had to leave the wax model 7% larger to account for shrinkage when casting in metal. Once complete, I had to attach a wax sprue to the ring (not shown) to create a clear channel for the metal to flow into once the wax was burned away. I'll explain that next.
 The next step is investment. The investment material starts as a white powder that is mixed with water, similar to plaster-o-paris, although much more durable when solidified. After investment the invested wax is placed in a kiln to burn away the wax, leaving just the investment material which is ready to accept the molten metal.
 The device that says EZ-CAST on the front is a centrifuge of some kind. I'm not entirely clear on it's workings, but basically it vacuums the investment to clear the air bubbles and then forces the liquid hot metal into the mold to achieve the best possibly casting. These pictures are weak, because I was working with hot metal and I was really concentrating on not becoming Johnny Tremain. The reddish blob in these shots is liquid hot silver. Ooooh.
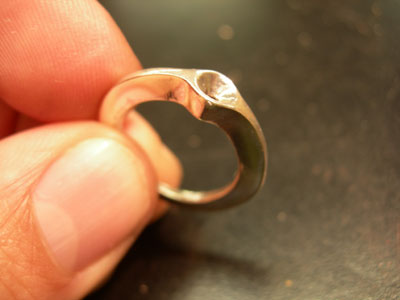
This next photo is the silver ring, all blackened and nasty after it came out of the investment. The big blob on the end is called the button. It's the hardened cooled version of the red blob you saw in the last photo.
I was dying to finish the ring, so I bought some jewelry tools & took the silver ring home to work on in between my Tuesday night sessions. On a few occasions I packed my stuff onto my bicycle and went down to the Niagara River to work. The image of the ring with the river in the background is where I cleaned the silver ring of it's firescale, and took some more girth off of the ring. As you can see, it's still a bit bulky. That's because the silver ring was only to be the prototype. I intended to do the final ring in white gold, so I was going to have to make a silicone mold of the silver ring, and then inject it with hot wax, and repeat the lost wax step in the kiln again to prepare for the final pour in white gold. So I needed to keep that 7% extra girth to allow for more shrinkage. If I was more experienced at this, I would never have made a prototype ring. I would've just cast in white gold in the first place.

 Here is the silver ring after an initial polishing. I didn't go nuts polishing it yet because of the next step, investing in silicone.
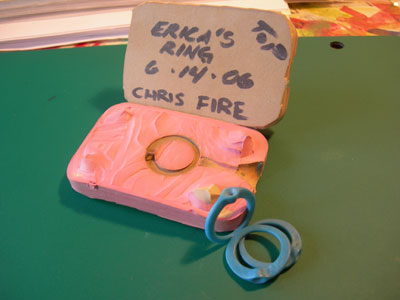 Here's the silicone mold, and 3 blue wax rings that I made from it. The silver ring was sandwiched in between 2 wafers of silicone, and a heat press was used to apply pressure and heat to fuse the silicone into a solid mold. An an x-acto is used to cut the silver ring out of the mold. I injected hot wax into the silicone mold from this vat that contained the hot wax under pressure. I probably made a dozen or so of these wax rings and chose the best 2 for the final investment in white gold.
So I repeated the lost wax kiln firing, and poured white gold for the final ring. After cleaning firescale, sizing the ring to Erica's ring size, and polishing, a post was soldered into the cup at the top, to hold the pearl in place. Next the stones were set . The pearl is a 7.2mm Tahitian Black Pearl, and the diamonds are tiny 2mm rocks to add a little bling. A dremel tool was used to drill 2 channels into the shank of the ring for the diamonds to set into. To hold the stones in place a tiny reciprocating hammer was used to hammer the metal over the edges of the diamonds, therby holding them in place. I didn't want to use the prong settings because besides altering the aesthetics of my design, they would snag on fabric all the time. And since Erica works with fabric,...
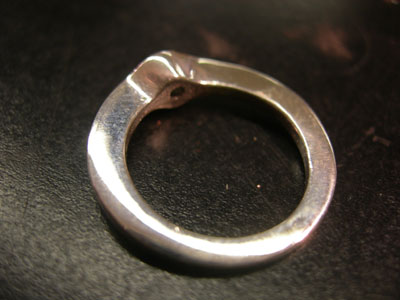
 So this is the final product! Click on it for a larger image.
