 As crews were cleaning up, someone spotted a rabbit eyeing the new connectors. This reporter was able to get a photo of the rabbit who, in this reporter's opinion, appears to be prime suspect Pepper Fire, out on bail and currently awaiting trial. Pepper's lawyer could not be reached for comment. "We wouldn't have to do so much clean-up if these trouble makers went to jail like they're supposed to, but the bleeding heart lawyers always keep them out. It's a real shame for the neighborhood. This used to be a nice neighborhood," said Sixpack.
Wednesday, December 17, 2008
Vandalism Update
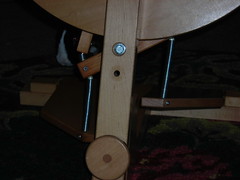
The Fire Family Living Room, Wednesday evening Crews finished repairing Friday night's bunny vandalism today. After installing new connections, or "rubbers" as wheel-maker Gordon Lendrum termed them, the repair crew added metal springs surrounding each piece, in hopes of thwarting any future attempts at vandalism. "You've got to keep ahead of these rabbits, always fixing and re-enforcing, otherwise the living room could go to hell in a couple of weeks, and that would bring the property value, and the whole neighborhood down faster than you can turn around," said project foreman Joe Sixpack.As crews were cleaning up, someone spotted a rabbit eyeing the new connectors. This reporter was able to get a photo of the rabbit who, in this reporter's opinion, appears to be prime suspect Pepper Fire, out on bail and currently awaiting trial. Pepper's lawyer could not be reached for comment. "We wouldn't have to do so much clean-up if these trouble makers went to jail like they're supposed to, but the bleeding heart lawyers always keep them out. It's a real shame for the neighborhood. This used to be a nice neighborhood," said Sixpack.
As crews were cleaning up, someone spotted a rabbit eyeing the new connectors. This reporter was able to get a photo of the rabbit who, in this reporter's opinion, appears to be prime suspect Pepper Fire, out on bail and currently awaiting trial. Pepper's lawyer could not be reached for comment. "We wouldn't have to do so much clean-up if these trouble makers went to jail like they're supposed to, but the bleeding heart lawyers always keep them out. It's a real shame for the neighborhood. This used to be a nice neighborhood," said Sixpack.
Sunday, December 14, 2008
Bunny Delinquents Charged With Vandalism
December 14, the Fire family living room. Early yesterday morning, police were summoned to the living room to investigate a reported act of vandalism. Police were led to the spot by distraught owner, Erica Fire. Ms. Fire explained to the officers that she had been giving the living room “a quick tidy” when she initially discovered the damage to her 10 year old Lendrum spinning wheel. “I pulled a cardboard tube that the rabbits had been chewing on out from under the treadle. Normally the treadle wouldn’t have moved, but this time it fell all the way to the floor,” said Fire.
On further investigation she discovered that the connecting piece from the treadle to the footman had been severed. After a brief inspection, Detective David Rodriguez stated with some certainty that the connection had been chewed, most likely by a lagomorph. Upon further questioning the Fire family revealed that Pepper Fire had been seen lurking in the vicinity about 12 hours before, possibly “casing” the wheel. After her arrest, Pepper went before Judge Richard C. Kloch, where she entered a not guilty plea. Bail is set at 5 carrots, a large broccoli head, and a bale of timothy hay. Charges are pending against her brother Dutch Fire who the police, at this time, characterize as a material witness. Dutch is currently awaiting trial on a previous charge involving several pillows and an expanse of carpeting.
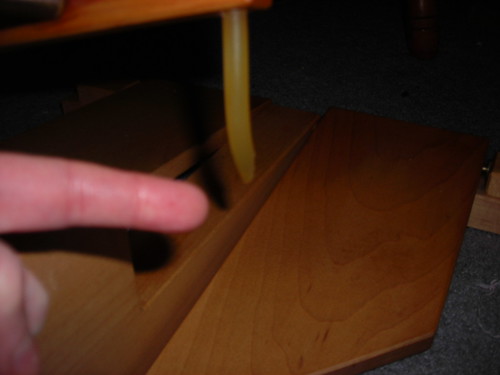 Vandalized spinning wheel causes great distress.
Frank Lipinski, the court appointed lawyer for both rabbits, hopes that he can convince Judge Kloch to go easy on the rabbits, in light of their troubled upbringing. “These aren’t the sort of fluffy bunnies you read about in stories, who come home at night to a mother with chamomile tea and dandelions. These rabbits grew up in squalid conditions, packed in with nearly 50 others, surrounded by excrement, and often going to bed at night hungry. In their short lives they’ve already been diagnosed with e. cunniculli and the snuffles. Even though the SPCA was able to rescue them from these deplorable conditions, and place them with the Fire household, there is no record of psychiatric evaluation or attempts at positive rabbit role modeling for these two. They don’t have the tools to make moral choices right now,” said Lipinski. Neither rabbit could be reached for comment.
Judge Kloch seemed unimpressed. “Yeah, we’ve all got problems,” he said, “but the law applies to all citizens equally, regardless of how many carrots they missed out on as kits.”
A court date is set for January 26th. The courtroom will be closed to cameras and other recording devices. “I don’t want this to turn into another OJ style media circus,” says Kloch.
On further investigation she discovered that the connecting piece from the treadle to the footman had been severed. After a brief inspection, Detective David Rodriguez stated with some certainty that the connection had been chewed, most likely by a lagomorph. Upon further questioning the Fire family revealed that Pepper Fire had been seen lurking in the vicinity about 12 hours before, possibly “casing” the wheel. After her arrest, Pepper went before Judge Richard C. Kloch, where she entered a not guilty plea. Bail is set at 5 carrots, a large broccoli head, and a bale of timothy hay. Charges are pending against her brother Dutch Fire who the police, at this time, characterize as a material witness. Dutch is currently awaiting trial on a previous charge involving several pillows and an expanse of carpeting.
Vandalized spinning wheel causes great distress.Frank Lipinski, the court appointed lawyer for both rabbits, hopes that he can convince Judge Kloch to go easy on the rabbits, in light of their troubled upbringing. “These aren’t the sort of fluffy bunnies you read about in stories, who come home at night to a mother with chamomile tea and dandelions. These rabbits grew up in squalid conditions, packed in with nearly 50 others, surrounded by excrement, and often going to bed at night hungry. In their short lives they’ve already been diagnosed with e. cunniculli and the snuffles. Even though the SPCA was able to rescue them from these deplorable conditions, and place them with the Fire household, there is no record of psychiatric evaluation or attempts at positive rabbit role modeling for these two. They don’t have the tools to make moral choices right now,” said Lipinski. Neither rabbit could be reached for comment.
Judge Kloch seemed unimpressed. “Yeah, we’ve all got problems,” he said, “but the law applies to all citizens equally, regardless of how many carrots they missed out on as kits.”
A court date is set for January 26th. The courtroom will be closed to cameras and other recording devices. “I don’t want this to turn into another OJ style media circus,” says Kloch.
Sunday, November 23, 2008
Foxfibre
 I'm in love with handspun cotton. I've been spinning cotton one and off for a few years now, and the sweater's I've knit from handspun cotton are some of my favorites. I've been looking at Foxfibre cotton for years now, and finally bought some a few months ago. I don't think as many people spin cotton as other fibers, so I offered to teach a cotton spinning class at my local shop.
To get ready for class, I pulled the Foxfibre out of my stash and started spinning for some colored washcloths. I had a very early version of the color "breeder's green," so when the roving looked more mustard yellow to me, I figured it just wasn't perfected yet. But then I remembered reading something about the color getting deeper with washing in hot water. I looked it up and discovered that it's a matter of boiling the cotton for an hour with something alkali, like washing soda. I boiled my finished skein in a gallon of water with 1/4 cup of washing soda and the results were amazing.
 At the bottom of the picture is the original roving, at the top is a washcloth knit from the yarn after treating it. Look at the color difference! Now that's green! Man, better living through bio-chemistry. I wish I knew how and why that happened. I'll try to get my Dad the chemist on it. I got a little more foxfibre in two other colors to use in my class. I can't wait to see how much they change.
The story of how Foxfiber was created is fascinating. You can read about how Sally Fox crossbred wild brown cotton with domestic white cotton to create a sturdy viable colored cotton. She was even able to breed several different colors out from that original brown. And she grows all of it organically. I think I need to buy enough to make a dress.
Thursday, November 13, 2008
Why I Love My Work
The other day, I spent most of my work time online, first researching depression era feedsack dresses, and then at a motorcycle parts page, among other things. The best part is, I wasn't screwing around--that's what I was supposed to be doing! Both were research for "Grapes of Wrath" coming up in the fall. OK, so that explains feedsack dresses, but motorcycle parts? As you may recall, Rosasharn is pregnant throughout the book, so we'll need to make a pregnancy pad for the (hopefully not pregnant) student who plays that part. I like to use open cell air filter foam for padding, as it has a nice texture and memory, but more especially because it dries quickly after washing or sweating. The motorcycle place sells sheets of foam so that if you have a vintage bike you can't get new filters for, you can create one. I love the spirit of that all on it's own, and am giddy with the idea of further re purposing the foam for a pregger pad!
Monday, October 27, 2008
A Little Perspective
The Republican party just spent $150,000.00 on new clothes for Sarah Palin. When it comes to politics and government, it's easy to let very large monetary figures wash over you. With a national debt in the tens of trillions of dollars, it can be difficult to remember just how large a sum $150,000.00 is.
On my way to work this morning I started calculating to try to put this kind of clothing budget into terms that intersect with my life and finances. After all, I make clothes for a living. The largest costume budgets I've come into contact with have been for operas. I don't handle the money or purchasing, so I don't usually know the exact budget of each opera on which I work, and I especially keep myself ignorant of the per yard cost of most fabrics before I cut them up. However, I do know that the costume budgets are generally in the tens of thousands of dollars. One of the first operas I worked on had a budget of $20,000.00 which the designer not only went over, but tripled. Even so, let's figure from $20,000.00 to $60,000.00 to costume an Opera. In all fairness, that budget does not include my or my crew's income, so add in between $9,000 and $13,000 for us. So an Opera could cost from $29,000.00 to 73,000.00.
Operas have a chorus. Sarah Palin does not. Operas are often opulent, chronicling the lives of the rich, or even of royalty. The Palins claim to be a down-to-earth household run by a hockey mom and a laborer. Operas are opulent. We are told that Alaska is not.
Somehow it costs two to five times as much to clothe Sarah Palin for the last few weeks of a campaign than it costs to create costumes for an entire Opera which will run for 2 months and be rented out in perpetuity.
Here's another point of view: how long does it take to earn $150,000.00? The median income in the US is a little over $40,000. At that income it would take almost 4 years to earn $150,000.00. More, if you'd like to still have that much after taxes. For me, I'd have to go back to the beginning of 2004 and continue to the end of this calendar year to have earned that much. To take home that much, probably back into 2001. I'm one of the few people who even save my tax information for that long.
Finally, what if I had donated to the Republican party? I don't donate to any politicians, and it would be a cold day in hell before I supported a Republican campaign, but lets just suppose for a moment that I had. My charitable donations usually range between $20 and $100. If I were to donate to a politician or political party, it would probably be in that range. I know that's a pittance compared to donations from corporations and wealthy individuals, but it would be a lot for me. If I donated, it would be to further the cause, to get the word out, to raise voter awareness of my candidate, to fund studies crucial to the campaign. It would not, in fact, be to buy clothes for someone who already has an income to buy their own clothes. In the face of $150,000.00 what would my donation even buy? Shoe laces? A pair of panties? Maybe socks? I mean, I can only guess that with at least 2 Operas worth of funding they're buying the most expensive clothes possible. They can't be spending it on more items than she'll wear before they become unfashionable next season.
If I were a republican donor, with McCain falling further behind in the poles, I'd be livid to see my money spent this way.
Of course, after being given the clothing, and wearing at least some of it, Ms. Palin has decided to say "no thanks" and go back to her old wardrobe. They claim she will not keep them but eventually donate the clothes to charity. I'm betting it gets overlooked and she keeps them. Just like she was able to keep and spend all the money she accepted for the "bridge to nowhere" to which she later said "no thanks." Maybe this is more of the same.
For that kind of money, every stitch of that clothing better be American union made.
Priceless
I've always felt a little bad that I didn't choose an education and career path that could save the planet. I did well in Math and Science in high school, but decided instead to go into theatre. In fact, when I interviewed for admission into Boston University's theatre conservatory program, the 2 men interviewing me looked at my grades and test scores and asked why someone so intelligent wanted to go into theatre. To this day, I don't know whether or not they were serious. I chose to make costumes partially because of a small but growing talent for it, but also because it presented a challenge that I couldn't always solve on the first attempt, unlike most of my other academic subjects. It was probably the first time I didn't just choose the easy path. Eventually, I did go to a college where I could double major in theatre design and physics, but before anyone gets impressed, remember that it's a physics degree from art school!
The point being that, for the most part, making costumes will do very little for the environment. Even though I use all my pencils down to stubs, and tape my larger scraps of paper back together to make patterns out of, by and large what I do does create a small but significant bit of waste (if anyone has use for small fabric scraps, speak up! They're just filling landfills). We also use electric lights and equipment with a fair amount of energy draw and though I wish it were othersiese, all of that nice hydroelectric power from Niarara Falls gets sent all the way to New York City, while or power comes from coal, nuclear, and other nastiness that makes the city of Niagara Falls smell like acid rain.
I had all but given up on my work having any sort of positive environmental impact until just a few days ago. Now that I'm working at a college, it's important to me to cultivate some student stitchers, both to get the show done and because the whole point of college is learning, and this is what they can learn from me. In that interest I've gathered up the students who have expressed interest in learning about costumes and am teaching them how to sew. Some have a little sewing experience when they come to me, but I have 2 right now who had never picked up a needle before I showed them how to thread one, knot, and begin sewing. I set up one of these girls with a series of buttons to sew. After a few questions and approval of the first button sewn, I left her to them and returned to my work. After a little while she got a call on her cell phone. I heard her tell her friend that she was busy sewing buttons and then state, "I guess now when the button comes off one of my shirts I won't have to throw it out."
Score one for the planet!
Wednesday, October 15, 2008
New Bunnies
Our family lost Rusty the wonderbun back in May. I haven't posted about that loss because I haven't been able to put into words what an amazing rabbit he was, or how much his loss hurts. Also, I've felt the need to keep that loss fairly private. I don't think Chris or I can bear the hurt and anger of reading some stranger posting a comment like, "Oh come on, he was just a rabbit."
Have you ever heard someone who has had lots of a certain kind of pet always talk about one in particular? They may have had 5 dogs over the course of their life, but there's just one they always tell stories about, and talk about how great he/she was and how much they miss him/her. Rusty was that pet. Maybe I can illustrate it better than describe it. This is a quick video I took of Rusty in the last year of his life.
Not only did he regularly come when called, but Chris could get Rusty to chase him from the kitchen to the living room every night before his dinner. I only wish I had gotten a video of the chase.
We still miss Rusty very much. I especially miss the way he used to sleep on our bed each night near my feet. That being said, we did finally take a trip out to the SPCA a few weeks ago to visit quite a few rabbits who were there, waiting for good homes. We spent time with several rabbits, and decided that one rabbit would never be able to fill Rusty's shoes, so we adopted a pair.
Introducing: Dutch and Pepper. These two are litter mates, male and female, who were already bonded. They were rescued from cruelty/neglect at the end of July. We're not sure how old they are. The SPCA thought 5 months, but our vet suspects younger. We started out by putting them into the cage together with Rusty's old litter pan, which sort of worked, in that they used it, but they also picked 2 or 3 other spots in the cage to use. after reviewing the litter training bits of the House Rabbit Society website and talking to our vet, we added a second litter pan. Now they use only the pans, and often sit in them as if they're sitting in matching armchairs. They also currently have a litter pan in the living room for when we let them out, but we're hoping that when they're a little older we can eliminate the room pan. I mention all this because one of the first questions we're asked about pet rabbits is whether they're litter trained.
Dutch is the male rabbit, and mostly black; Pepper is the female and has more traditional dutch breed markings with her white shoulders and feet. We've been greatly enjoying their antics, although we wish they were more comfortable being touched. Right now, they love to come up to us, bonk us with their noses and even put their front feet on us, but they're skittish about being touched. This will change over time, as they get used to humans. It's frustrating right now, because they're so cute and we want to pet them.
Dutch's specialty is speed:
Friday, September 19, 2008
Cabled Socks and Finished Fleece
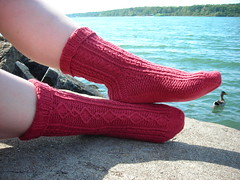 I do still knit. Check out these socks from "Socks Socks Socks" that I just finished. Love the color, love the cables. Didn't love the fact that the pattern was written to stop cabling 2 inches before the toe decreases started. It looked weird with all that blank space, and made even my size six wide feet look weirdly long and pointy, so I ripped back and continued the pattern until the toe decrease started.
Check out the duck in the background between my toes.
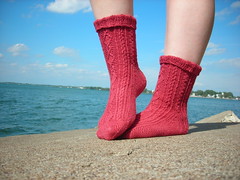 And for those who think that Buffalo's weather is unappealing, just look at that sky and water. Chris was kind enough to embarrass himself by participating in a public sock photo shoot in the middle of a park along the Niagara river. Oh, and this is after he was nice enough to buy me a lemon ice. These were taken last weekend on a beautiful sunny warm but not too hot day in mid-September. For the record: the upper Midwest is much, much colder than Buffalo, and Syracuse NY consistently gets more snowfall. The only reason Buffalo has the reputation it does is because the stupid football team plays in the snow belt in an open stadium. The rest of us live and work outside the snow belt.
I finished spinning the fiber study yarns a while ago, but it wasn't until getting home from my various freelance jobs that I was able to wash, measure and label the last skeins. What beauties! This is the whole study, all finished.
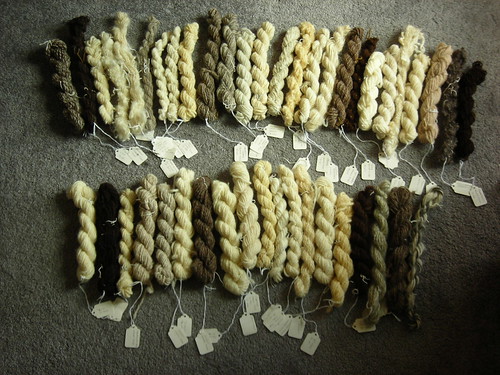 Right now, I'm planning to keep all of these samples in this form, so that I can use them as reference for how each breed looks and feels when spun. If I want to know how it knits up, I'll knit a sample, but I may return the sample to a skein when I'm done. I just find these so useful, especially in conjunction with the notes I took as I worked through the study, and the breed information that came with the study or was provided by Chris (spinner, not husband). Plus, they make for an incredibly appealing group of objects.
Thursday, September 11, 2008
Recommended Reading
There's been some news lately about banned books. There is even a list of banned books circulating on the internet, erroneously claimed to be a list of books Sarah Palin asked to be banned from her local library. While that is inaccurate (after all, she couldn't have asked to ban any of the Harry Potter books back in 1996, before they were written) the list itself is taken from a compilation list of books that have been banned in different places at different times. It's a compelling list--some of the best books I've ever read are on it.
So I'm reprinting the list here, and I'd love to encourage all my friends and family, and anyone else with a blog who comes across this, to do the same thing I'm doing. Print the list, and in some way mark which of the books on it you've read. I'd love to know what you thought of them, individually or in general. I know a lot of my fiber friends love novels, as do college pals, theater friends, family, and everyone else I know who checks on my blog. Drum up some readership in the comments with a link to your post, I'd love to see it!
Here's the list. Books I've read are in green.
**I've read the Bible a few times now, but I haven't read this particular translation.
My best criteria for whether something is a good book is whether it changes me, and many of the books I've highlighted here did just that. They're intelligent, they're challenging, not one of them is gratuitous or immoral. Interesting that only worthwhile books get banned. For instance, there isn't a single vapid romance novel on this list. I think I'll start reading the rest of the list.
So I'm reprinting the list here, and I'd love to encourage all my friends and family, and anyone else with a blog who comes across this, to do the same thing I'm doing. Print the list, and in some way mark which of the books on it you've read. I'd love to know what you thought of them, individually or in general. I know a lot of my fiber friends love novels, as do college pals, theater friends, family, and everyone else I know who checks on my blog. Drum up some readership in the comments with a link to your post, I'd love to see it!
Here's the list. Books I've read are in green.
A Wrinkle in Time by Madeleine L'Engle*I never read all of "Our Bodies, Ourselves," but I did read the chapter on lesbians in my aunt's copy when I was a teenager, so that has to count for something.
Annie on My Mind by Nancy Garden
As I Lay Dying by William Faulkner
Blubber by Judy Blume
Brave New World by Aldous Huxley
Bridge to Terabithia by Katherine Paterson
Canterbury Tales by Chaucer
Carrie by Stephen King
Catch-22 by Joseph Heller
Christine by Stephen King
Confessions by Jean-Jacques Rousseau
Cujo by Stephen King
Curses, Hexes, and Spells by Daniel Cohen
Daddy's Roommate by Michael Willhoite
Day No Pigs Would Die by Robert Peck
Death of a Salesman by Arthur Miller
Decameron by Boccaccio
East of Eden by John Steinbeck
Fallen Angels by Walter Myers
Fanny Hill (Memoirs of a Woman of Pleasure) by John Cleland
Flowers For Algernon by Daniel Keyes
Forever by Judy Blume
Grendel by John Champlin Gardner
Halloween ABC by Eve Merriam
Harry Potter and the Sorcerer's Stone by J.K. Rowling
Harry Potter and the Chamber of Secrets by J.K. Rowling
Harry Potter and the Prisoner of Azkaban by J.K. Rowling
Harry Potter and the Goblet of Fire by J.K. Rowling
Have to Go by Robert Munsch
Heather Has Two Mommies by Leslea Newman
How to Eat Fried Worms by Thomas Rockwell
Huckleberry Finn by Mark Twain
I Know Why the Caged Bird Sings by Maya Angelou
Impressions edited by Jack Booth
In the Night Kitchen by Maurice Sendak
It's Okay if You Don't Love Me by Norma Klein
James and the Giant Peach by Roald Dahl
Lady Chatterley's Lover by D.H. Lawrence
Leaves of Grass by Walt Whitman
Little Red Riding Hood by Jacob and Wilhelm Grimm
Lord of the Flies by William Golding
Love is One of the Choices by Norma Klein
Lysistrata by Aristophanes s
More Scary Stories in the Dark by Alvin Schwartz
My Brother Sam Is Dead by James Lincoln Collier and Christopher Collier
My House by Nikki Giovanni
My Friend Flicka by Mary O'Hara
Night Chills by Dean Koontz
Of Mice and Men by John Steinbeck
On My Honor by Marion Dane Bauer
One Day in The Life of Ivan Denisovich by Alexander Solzhenitsyn
One Flew Over The Cuckoo's Nest by Ken Kesey
One Hundred Years of Solitude by Gabriel Garcia Marquez
Ordinary People by Judith Guest
Our Bodies, Ourselves by Boston Women's Health Collective*
Prince of Tides by Pat Conroy
Revolting Rhymes by Roald Dahl
Scary Stories 3: More Tales to Chill Your Bones by Alvin Schwartz
Scary Stories in the Dark by Alvin Schwartz
Separate Peace by John Knowles
Silas Marner by George Eliot
Slaughterhouse-Five by Kurt Vonnegut, Jr.
Tarzan of the Apes by Edgar Rice Burroughs
The Adventures of Huckleberry Finn by Mark Twain
The Adventures of Tom Sawyer by Mark Twain
The Bastard by John Jakes
The Catcher in the Rye by J.D. Salinger
The Chocolate War by Robert Cormier
The Color Purple by Alice Walker
The Devil's Alternative by Frederick Forsyth
The Figure in the Shadows by John Bellairs
The Grapes of Wrath by John Steinbeck
The Great Gilly Hopkins by Katherine Paterson
The Handmaid's Tale by Margaret Atwood
The Headless Cupid by Zilpha Snyder
The Learning Tree by Gordon Parks
The Living Bible by William C. Bower**
The Merchant of Venice by William Shakespeare
The New Teenage Body Book by Kathy McCoy and Charles Wibbelsman
The Pigman by Paul Zindel
The Seduction of Peter S. by Lawrence Sanders
The Shining by Stephen King
The Witches by Roald Dahl
The Witches of Worm by Zilpha Snyder
Then Again, Maybe I Won't by Judy Blume
To Kill A Mockingbird by Harper Lee
Twelfth Night by William Shakespeare
Webster's Ninth New Collegiate Dictionary by the Merriam-Webster Editorial Staff
Witches, Pumpkins, and Grinning Ghosts: The Story of the Halloween Symbols by Edna Barth
**I've read the Bible a few times now, but I haven't read this particular translation.
My best criteria for whether something is a good book is whether it changes me, and many of the books I've highlighted here did just that. They're intelligent, they're challenging, not one of them is gratuitous or immoral. Interesting that only worthwhile books get banned. For instance, there isn't a single vapid romance novel on this list. I think I'll start reading the rest of the list.
Saturday, August 09, 2008
hefeweizen tidbit

Interesting tidbit about hefeweizens. I’ve thought for years that I don’t like Blue Moon, an American made Belgian Witt, or wheat beer. Turns out I don’t like it in bottles. On tap it’s great! I’ve also discovered over the years that I’ve only really liked hefeweizens that were brewed at the restaurant I drank them at. I thought maybe it was a matter of freshness, so some time last year I brewed one of my own. Mine was good, but didn’t have the full fruity character that is characteristic of a true hefe–often described as a taste of banana and clove. Then I re-read something in a brewing book about Germans rolling bottled hefe on the table before opening it to mix the yeast in. I tried it with mine. What a difference! There was the flavor I was missing! If only I had re-read that before we were half way through drinking the batch!
Friday, August 08, 2008
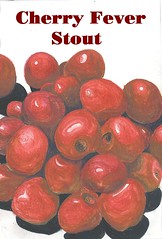
Cherry Fever Stout
I enjoy freelancing. It’s great to have the chance to work in bigger cities that truly support the arts, or for bigger organizations with more enthusiastic support than is to be found in Buffalo. I love meeting other professionals from around the country, picking up ideas from other drapers, and making friends who are all over the country working in our small but spread out profession. When I got to the Shakespeare Theatre in DC, I realized that I had worked at the Santa Fe Opera at the same time as one of the other drapers at the Shakespeare. She just looked at me, and without batting an eyelash said, “Of course you did, because there are only six people who work in theatre.” It often feels that way, when I travel to a new city only to discover that I’m working with 5 people I’ve already worked with before.
The downside of freelancing is that, in the long term, it’s hard to feel like anyplace is home. For someone like me, who does have a home and more importantly a husband who is my real home, freelancing can start to wear me down. I’ve been gone for 5 months, and boy was it good to pull into the driveway and unload all my stuff for a good long time. (In case you're curious, “a good long time” is 9 months.)
There’s a lot of other little stuff I started to miss while freelancing, like easily available internet, my own bed, and my many hobbies, most of which don’t fit on a plane or are too much to pack in the truck. I was thrilled to pick up my spinning wheel half way through the journey, but at this point it’s been 7 ½ months since I’ve brewed a batch of beer. I had been planning to brew a German maibock in time for May, but Studio Arena closed just when I would have started it.
So after unloading the truck and kissing my husband hello, I cracked open a sweet stout from my last batch (Chris didn’t even make a dent in 5 gallons of beer over 5 months, so it was almost all still here waiting for me) and hit the books. I landed again on a recipe for a cherry stout, made some calls to locate frozen sour cherries at one of the local farm markets, and got to business.
I’ve had Belgian ales and lambics that included cherries, but not a stout. This is probably not the sort of thing anyone will be serving me anytime soon, so if I want it (and I do!) I’ll have to make it myself.
The cherries get added to the wort after the boil for long enough to pasteurize them, but the recipe (found in The Complete Joy of Homebrewing) cautions not to boil again with the cherries, or it will set the pectin and leave the beer with an unpleasant haze.
The last two falls, I’ve brewed a pumpkin ale, which calls for boiling with the pumpkin, but then removing it before the wort goes into the fermenter. This recipe ferments with the cherries for the first five days to make the most of their fermentable sugars. They won’t actually add any sweetness to the final beer, because all the sugar will be used in the fermentation and converted to CO2 and alcohol. They will add their amazing sour cherry flavor, but I have no clear idea about how the final brew will taste.

I was so excited about the cherries that I decided to feature them on the label. I often draw my labels while boiling the wort, but this one took a lot longer than that, probably longer than the actual brewing process. I hand draw my labels (as opposed to using photos or clip art or asking Chris to do it) because I like the look, but also because I never do any real drawings anymore, just quick working sketches, usually of sweaters on headless bodies. The labels keep me in practice. It’s not as much about keeping the skill sharp as about the kind of observation needed to draw something. Looking at something to draw it involves analysis, not of what it is, but of what it looks like, and HOW it looks that way. Not to look and let the brain say, "hey, that’s a round cherry," but to break down and reproduce the visual cues that the brain used to interpret that it’s round. I seldom look at things that way in any other part of life, because there’s no time and I rely on my brain’s interpretation skills to understand things quickly. Drawing something lets me slow down and look at that thing, live in the moment, and understand what I’m experiencing without short cuts or assumptions. It’s like (my limited understanding of) Buddhist mindfulness, or like the scene at the end of Our Town when Emily, after death, is given the chance to live one moment of her now finished life over again. This time she really experiences it and treasures it and pays attention and LIVES it. When she asks if anyone can ever go through life this way, she is told no not always, but sometimes poets and artists come close.
Here’s what that has to do with beer (and don’t even think that was off track):
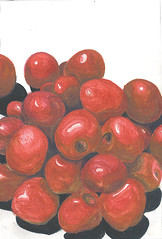
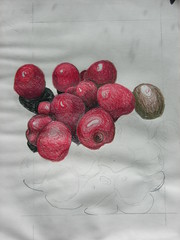
A fairly successful image of cherries. Because I was pleased, and loved the color theory involved, I also took a process picture to show the “underpainting” that I used to get the shadow colors. The cherry off to the right that looks like an olive shows only those colors, before I laid the red over the whole thing. I used water color pencils, so after drawing in the layers of color, I carefully painted over them with a wet brush to blend them and get a much richer color and more of a painted look.
This has been a good technique for me, as I’ve always been much more confident drawing than painting.
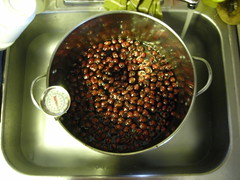
Right now the fermenting wort looks like this:

No, not a fashion statement. Ale yeast ferments best between 60 and 75 degrees F. It has been a bit over that in the apartment, but I didn’t want to wait until September to brew, so I’m using a trick I read in The Homebrewer’s Recipe Guide, which is to put a wet tee shirt over your fermenter so that the evaporating water will cool it. It’s working well, and has brought my wort temp down from 82 deg to 77.
The downside of freelancing is that, in the long term, it’s hard to feel like anyplace is home. For someone like me, who does have a home and more importantly a husband who is my real home, freelancing can start to wear me down. I’ve been gone for 5 months, and boy was it good to pull into the driveway and unload all my stuff for a good long time. (In case you're curious, “a good long time” is 9 months.)
There’s a lot of other little stuff I started to miss while freelancing, like easily available internet, my own bed, and my many hobbies, most of which don’t fit on a plane or are too much to pack in the truck. I was thrilled to pick up my spinning wheel half way through the journey, but at this point it’s been 7 ½ months since I’ve brewed a batch of beer. I had been planning to brew a German maibock in time for May, but Studio Arena closed just when I would have started it.
So after unloading the truck and kissing my husband hello, I cracked open a sweet stout from my last batch (Chris didn’t even make a dent in 5 gallons of beer over 5 months, so it was almost all still here waiting for me) and hit the books. I landed again on a recipe for a cherry stout, made some calls to locate frozen sour cherries at one of the local farm markets, and got to business.
I’ve had Belgian ales and lambics that included cherries, but not a stout. This is probably not the sort of thing anyone will be serving me anytime soon, so if I want it (and I do!) I’ll have to make it myself.
The cherries get added to the wort after the boil for long enough to pasteurize them, but the recipe (found in The Complete Joy of Homebrewing) cautions not to boil again with the cherries, or it will set the pectin and leave the beer with an unpleasant haze.
The last two falls, I’ve brewed a pumpkin ale, which calls for boiling with the pumpkin, but then removing it before the wort goes into the fermenter. This recipe ferments with the cherries for the first five days to make the most of their fermentable sugars. They won’t actually add any sweetness to the final beer, because all the sugar will be used in the fermentation and converted to CO2 and alcohol. They will add their amazing sour cherry flavor, but I have no clear idea about how the final brew will taste.
I was so excited about the cherries that I decided to feature them on the label. I often draw my labels while boiling the wort, but this one took a lot longer than that, probably longer than the actual brewing process. I hand draw my labels (as opposed to using photos or clip art or asking Chris to do it) because I like the look, but also because I never do any real drawings anymore, just quick working sketches, usually of sweaters on headless bodies. The labels keep me in practice. It’s not as much about keeping the skill sharp as about the kind of observation needed to draw something. Looking at something to draw it involves analysis, not of what it is, but of what it looks like, and HOW it looks that way. Not to look and let the brain say, "hey, that’s a round cherry," but to break down and reproduce the visual cues that the brain used to interpret that it’s round. I seldom look at things that way in any other part of life, because there’s no time and I rely on my brain’s interpretation skills to understand things quickly. Drawing something lets me slow down and look at that thing, live in the moment, and understand what I’m experiencing without short cuts or assumptions. It’s like (my limited understanding of) Buddhist mindfulness, or like the scene at the end of Our Town when Emily, after death, is given the chance to live one moment of her now finished life over again. This time she really experiences it and treasures it and pays attention and LIVES it. When she asks if anyone can ever go through life this way, she is told no not always, but sometimes poets and artists come close.
Here’s what that has to do with beer (and don’t even think that was off track):
A fairly successful image of cherries. Because I was pleased, and loved the color theory involved, I also took a process picture to show the “underpainting” that I used to get the shadow colors. The cherry off to the right that looks like an olive shows only those colors, before I laid the red over the whole thing. I used water color pencils, so after drawing in the layers of color, I carefully painted over them with a wet brush to blend them and get a much richer color and more of a painted look.
This has been a good technique for me, as I’ve always been much more confident drawing than painting.
Right now the fermenting wort looks like this:
No, not a fashion statement. Ale yeast ferments best between 60 and 75 degrees F. It has been a bit over that in the apartment, but I didn’t want to wait until September to brew, so I’m using a trick I read in The Homebrewer’s Recipe Guide, which is to put a wet tee shirt over your fermenter so that the evaporating water will cool it. It’s working well, and has brought my wort temp down from 82 deg to 77.
Tuesday, August 05, 2008
Why 3?
I love the colors in Noro yarn. especially the long fading repeats. Recently, I started seeing friends using Noro's sock yarn, which uses the same kind of long repeat, but weirdly provides three repeats in a ball. 3? Socks usually come in pairs, right? I get two size six socks out of 100 grams of sock yarn with a fair amount left over. Lots of folks get 2 pair out of 100 grams with little left over, and some can make it on 100 grams if they do a contrasting heal and toe. I don't see how 3 repeats in 100 grams helps any of us. Also, at $20 a ball I wasn't buying another just to get the pattern right. I figured each sock would take 1 1/4 to 1 1/2 repeats, so I sucked it up and knit the first sock, cut the yarn, and knit another the same size. This is what I got.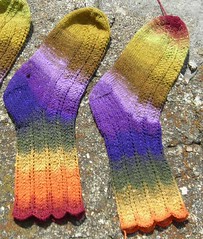 Having been a first hand for 6 years, this drives me absolutely nuts. In a costume shop, the first hand assists the draper and is in charge of laying out and cutting the draper's clothing patterns. That means one of the few things that is solely the first hand's responsibility is pattern layout. Not just the dreaded matching of plaids that you read about in Judy Blume novels, but also matching florals, paisleys, etc and arranging bias stripes to chevron at seams or patterns to mirror themselves at center back and center front. That being said, a heavy stripe pattern being two inches off, like those two socks up there when worn next to each other, is way worse than if the two had nothing to do with eachother.
I couldn't take it, but weirdly enough, for my little feet each sock took slightly less than a full repeat, so I picked the placement I preferred (the second sock I knit, which is the one on the left in the picture) and I started from the same spot in the pattern repeat and knitted a third sock.
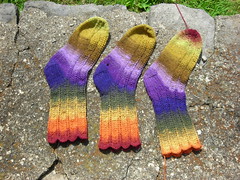 Now, if the aliens land on a rainy day and get a soaker on their way from their ship to my door, I can offer a trio of dry socks, helpful to any tri-pedal alien who wears a woman's size six. It felt weird to still be knitting the same pair of socks after I had already finished 2, but look how much better this pair looks:
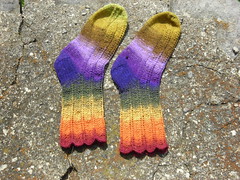
Now I can wear them in front of my first hand without shame, and can still hear what Chris is saying to me while I'm wearing them. much better.
Having been a first hand for 6 years, this drives me absolutely nuts. In a costume shop, the first hand assists the draper and is in charge of laying out and cutting the draper's clothing patterns. That means one of the few things that is solely the first hand's responsibility is pattern layout. Not just the dreaded matching of plaids that you read about in Judy Blume novels, but also matching florals, paisleys, etc and arranging bias stripes to chevron at seams or patterns to mirror themselves at center back and center front. That being said, a heavy stripe pattern being two inches off, like those two socks up there when worn next to each other, is way worse than if the two had nothing to do with eachother.I couldn't take it, but weirdly enough, for my little feet each sock took slightly less than a full repeat, so I picked the placement I preferred (the second sock I knit, which is the one on the left in the picture) and I started from the same spot in the pattern repeat and knitted a third sock.
Now, if the aliens land on a rainy day and get a soaker on their way from their ship to my door, I can offer a trio of dry socks, helpful to any tri-pedal alien who wears a woman's size six. It felt weird to still be knitting the same pair of socks after I had already finished 2, but look how much better this pair looks:Now I can wear them in front of my first hand without shame, and can still hear what Chris is saying to me while I'm wearing them. much better.
Tuesday, July 15, 2008
Postcards From Cooperstown
It's been a busy summer, more hectic than some, but there's still time to do a bit of site seeing around the Cooperstown area. Of course I adore the Farmer's Museum, where the chickens walk around the grounds with you.
 Various flowers are blooming around the house. I think these are the flowering sweet peas that Lisa planted.
 This was my tenth year at the Springfield 4th of July parade. This tractor is just slightly earlier than my favorite style of John Deere. I think this one is late 30's early 40's, and my favorite is mid to late 40's.
 I didn't get a picture of the Opera's float, but there are several at the Opera blog entry for Independence Day. I did check the corn, which was indeed knee high by the fourth of July.
 Our attempt at going to the Sterling Renaissance Festival (which I was last at 19 years ago) was horribly rained out, so the only photo I got was of Brittney filling her tank in full Elizabethan underwear.

Various flowers are blooming around the house. I think these are the flowering sweet peas that Lisa planted.This was my tenth year at the Springfield 4th of July parade. This tractor is just slightly earlier than my favorite style of John Deere. I think this one is late 30's early 40's, and my favorite is mid to late 40's.I didn't get a picture of the Opera's float, but there are several at the Opera blog entry for Independence Day. I did check the corn, which was indeed knee high by the fourth of July.Our attempt at going to the Sterling Renaissance Festival (which I was last at 19 years ago) was horribly rained out, so the only photo I got was of Brittney filling her tank in full Elizabethan underwear.
Wednesday, July 02, 2008
Faith in the Trenches
In the past few years, I’ve gotten much more involved in gardening. I didn’t build or plant the garden beds here at the farmhouse. They have been passed down through various opera employees who have been housed here over the years, but I suspect started with an earlier more permanent resident. The garden improved greatly over the past 3 or 4 years after I started hoeing in the compost each May left from the previous summer’s compost pile. The first year the herb bed got compost, it went from only growing ten inch high basil to growing 2 foot high basil bushes. Let it never be said that compost doesn’t work!
As I get more involved in (and attached to) this garden, I get more ambitious about what I plant. I also get more optimistic about how long I think I’ll keep coming back to the Opera to reap the harvest of my previous year’s work. And of course, if I am going to expand the area and content of the garden, doing so with perennials means that I won’t have to keep planting all that space every year.
This year’s perennial expansion includes mint transplanted from Dad’s garden so I can have minty iced tea, rhubarb, and asparagus. All the mint that used to grow at the farmhouse has died out, so I got some of Dad’s unstoppable mint. We don’t even really know what kind it is (although it looks the most like pictures of spearmint) because it was already growing at my parents’ house when they moved in the year before I was born. I planted it after Memorial Day, and there’s already twice as much as I planted. The rhubarb is a hopeful investment for next year’s pies, but the asparagus is a real study in faith.
I tend to feel like most gardening is a study in faith. It’s not surprising at all that Jesus used planting and harvest in so many of his parables. It takes only a little faith to believe that when I plant a small plant, like tomato plants or herbs, it will grow to be a larger version of itself. It takes a tiny bit more faith to believe it will eventually bear fruit. For me, the really powerful experience is planting seeds, and then spending weeks carefully tending a patch of dirt. I’ve seen my lettuce seeds grow into a pretty impressive bed of salad for years now, but it still seems miraculous every time. It’s only faith in experience, in the words on the back of the seed packet, and in the previous experience of so many other gardeners, that keeps me coming back each morning to lovingly water a patch of dirt as if it was a bed of lettuce. And every spring, after a week or two of faithful, but emotionally illogical dirt watering, lettuce grows! I water even while I doubt. I question whether I planted it right this year, whether the seeds I bought are viable, whether I’ve planted at the right depth, provided the right amount of water, whether I’ve waited long enough to avoid frost. Even though I doubt, I continue to tend out of faith, and my faith is rewarded.
This spring, when I planted the asparagus, I set myself up for a much bigger test of my gardening faith. First off, I’m trusting that I will still be working at Glimmerglass in the summer of 2010 when I’ll get my first full harvest. Second, I’m trusting that planting dead stuff that looks like an octopus made out of dry sticks and raffia is going to actually result in asparagus, and wasn’t just a hoax perpetrated by the garden supply store. The best part is that both Rachel and Brittney joined in on my act of faith and helped dig THE TRENCH.

I am very proud of THE TRENCH. Every summer, I garden with only a few rudimentary tools, like a crappy old shovel and a nicer pitchfork. There are no rototillers or garden weasels. There isn’t even a wheel barrow to move the compost. The three of us used a hoe, a crappy shovel, and a pitchfork to dig THE TRENCH 10 feet long, 18 inches wide, and 12 inches deep, plus we had to loosen and de-rock an additional 6 inches of soil below that. Then, as it was getting dark, we went over to our neighbors, the dairy farmers, and politely asked for 3 buckets of old cow manure. We got to ride in a Dodge Dakota up to the hill where such stuff was piled and, with our shovels and rakes and implements of destruction, dig up our bucket fulls and ride back down to THE TRENCH. My intrepid helpers learned the hard way that when riding in the bed of an open truck with buckets of manure, one should ride forward of the buckets of manure to keep one’s eyes clear of debris.

Then began the layers. Commercial 10-10-10 fertilizer was spread in the bottom of THE TRENCH, then the manure, then 2" of dirt, then the dry spidery roots–10 of them at 1 foot intervals. Then another 6 inches of dirt. Then began the waiting. As the waiting got really long, my faith began to stretch and crack. After all, this was an involved process with lots of steps that could be screwed up. I could have buried the roots too deep, they might have sat dormant in the store for too long, they might be too close to the manure and get “burned.” I started looking for information on how long it should take for them to come up. Dad didn’t really remember, as his asparagus bed is at least 15 years old. “Sprocket’s Victory Garden” didn’t say. Most websites don’t say. I finally found one that said, “after several weeks,” and another that said “as the summer progresses.” I got antsy. That’s a whole lot of work, much of it offered freely by friends, that I’d hate to see result in nothing. I started getting worried that I wouldn’t see any asparagus before leaving at the end of July. I’m supposed to wait until it comes up before filling in THE TRENCH the rest of the way. I’d really like to fill it in the rest of the way, because I’m tired of having to weed the pile of dirt that’s waiting to go back into the THE TRENCH from whence it came.
Then yesterday morning, there it was.

One teeny tiny asparagus shoot. Asparagus in miniature. My shaky faith has been shored up. My doubt has been dispelled. If nothing else, asparagus #1, on the far left end, has come up. Now I’m waiting for the others, so I can finish the job.

Tuesday, May 20, 2008
How Not To Thrum Mittens
I like to analyze how things are made, and to know why they were originally made that way. I spend a lot of time at work poring over old tailor’s drafts and all the other information I can find about how garments were made in past centuries, and I love figuring out why they are made like that, and getting into the long dead tailor’s or seamstress’ mind. And then I figure out how I may need to adjust them for modern materials, and modern bodies, and how I may want to improve them, at least in small ways. When it comes to knitting, I almost always feels that there are ways that I can improve the pattern as written. I feel that I know more about fit than most pattern writers, and I fully believe that it’s better to knit something as seemlessly as possible than to knit it in a bunch of separate pieces as most patterns instruct. This infuriating belief that I always know better can sometimes backfire on me.
I decided to make thrummed mittens after reading about them in a Spin Off article a few years ago. I erroneously thought that they had been invented by the writer of the article. When I saw that each thrum was a separate piece, I decided that that was a mistake on which I could improve. So instead I decided to use a continuous piece of roving, with the idea that it would be more secure than individual bits. Boy was I wrong. Because the roving was caught at all different points within each fiber, much of it disappeared with use, and came out of the mittens as annoying extraneous fluff.
 As you can see here, after a few years of wear, the roving worked in as another “yarn” is too thin to really add to the overall warmth of the mittens. I really like these mittens, are at least the idea of these mittens, because they include wool from Oscar, Lilly, Iris, and Blaze, all of whom were sheep I had met and who are no longer with us, and also angora from my first pet rabbit Jessica, who has been gone for over 5 years now. Also, they match my hat and scarf. So after researching more about thrumming, and realizing that sometimes things are done that way for a reason and don’t need my help, I decided to unravel and reknit them the right way.
 I started by unraveling the yarn, winding it back into a skein, and washing it. This took out all the kinks, fluffed it up again, and got it really clean. Think about it, the soap may not really get in between all the stitches when you wash a knitted garment, but boy it can get all the way around strands of yarn in a loose skein.
 I threw out the remains of the brown roving, and started fresh. I ended up using at least twice what is pictured of the dark brown for the thrums.
As for actually thrumming the right way, both the Yarn Harlot and Adria at hello yarn have excellent and well photographed instructions posted for free at their blogs. (Click on their names to see!) I did a combination of the two, maybe leaning slightly more towards the Harlot’s method.
 The actual thrummed mittens. Look how much fuller and fluffier they are than the first attempt. It’s best to wait until spring to unravel one’s winter mittens, so I can’t test them while shoveling snow in Buffalo until at least late October, but I can tell just by putting them on that they’re way warmer.

I decided to make thrummed mittens after reading about them in a Spin Off article a few years ago. I erroneously thought that they had been invented by the writer of the article. When I saw that each thrum was a separate piece, I decided that that was a mistake on which I could improve. So instead I decided to use a continuous piece of roving, with the idea that it would be more secure than individual bits. Boy was I wrong. Because the roving was caught at all different points within each fiber, much of it disappeared with use, and came out of the mittens as annoying extraneous fluff.
 As you can see here, after a few years of wear, the roving worked in as another “yarn” is too thin to really add to the overall warmth of the mittens. I really like these mittens, are at least the idea of these mittens, because they include wool from Oscar, Lilly, Iris, and Blaze, all of whom were sheep I had met and who are no longer with us, and also angora from my first pet rabbit Jessica, who has been gone for over 5 years now. Also, they match my hat and scarf. So after researching more about thrumming, and realizing that sometimes things are done that way for a reason and don’t need my help, I decided to unravel and reknit them the right way.
  I started by unraveling the yarn, winding it back into a skein, and washing it. This took out all the kinks, fluffed it up again, and got it really clean. Think about it, the soap may not really get in between all the stitches when you wash a knitted garment, but boy it can get all the way around strands of yarn in a loose skein.
 I threw out the remains of the brown roving, and started fresh. I ended up using at least twice what is pictured of the dark brown for the thrums.
As for actually thrumming the right way, both the Yarn Harlot and Adria at hello yarn have excellent and well photographed instructions posted for free at their blogs. (Click on their names to see!) I did a combination of the two, maybe leaning slightly more towards the Harlot’s method.
 The actual thrummed mittens. Look how much fuller and fluffier they are than the first attempt. It’s best to wait until spring to unravel one’s winter mittens, so I can’t test them while shoveling snow in Buffalo until at least late October, but I can tell just by putting them on that they’re way warmer.
Friday, March 28, 2008
Buffalo Guys' Diamond Socks–The Well Explained Wordy Pattern
This pattern is long, but carefully explained for knitters who have not knit many socks yet. If you are an experienced sock knitter, you may want to use the short form.
Sized to fit ankles 9 ½-10, (10 ½-11) inches in circumference
Lengths given for men’s shoe sizes 6-14
Gauge: 9 sts per inch
Needles: 1 set of double points in correct size to obtain gauge. (I used zeros, I knit loose. Do a swatch, it’ll make things go better for you later, honest.)

Instructions:
Cast on 72 (80) sts. (If you know how, cast on in ribbing for 2x2 rib. If you don’t know how, don’t worry, any stretchy cast on you already know will be fine.) Divide onto 3 needles, place a marker for the beginning of the round, and join, being careful not to twist.
R 1: k2, p2, repeat around.
R 2-20: continue in 2x2 rib (i.e. repeat round 1)
R 21: reset stitch counter or brain to round 1, this is the beginning of the diamond pattern.
Diamond pattern for leg:
R 1: p1, k3, p1, k3, repeat around
R 2: p1, k3, p1, k3, repeat around
R 3: k3,*[ p1, k1, p1, k5] repeat from star around, ending p1, k1, p1, k2
R 4: k3,*[ p1, k1, p1, k5] repeat from star around, ending p1, k1, p1, k2
R 5: k2, *[p1, k3, p1, k3] repeat from star around, ending p1, k3, p1, k1
R 6: k2, *[p1, k3, p1, k3] repeat from star around, ending p1, k3, p1, k1
R 7: k1, *[p1, k5, p1, k1] repeat from star around, ending p1, k5, p1
R 8: k1, *[p1, k5, p1, k1] repeat from star around, ending p1, k5, p1
R 9: p1, k3, p1, k3, repeat around
R 10: p1, k3, p1, k3, repeat around
R 11: k1, *[p1, k5, p1, k1] repeat from star around, ending p1, k5, p1
R 12: k1, *[p1, k5, p1, k1] repeat from star around, ending p1, k5, p1
R 13: k2, *[p1, k3, p1, k3] repeat from star around, ending p1, k3, p1, k1
R 14: k2, *[p1, k3, p1, k3] repeat from star around, ending p1, k3, p1, k1
R 15: k3,*[ p1, k1, p1, k5] repeat from star around, ending p1, k1, p1, k2
R 16: k3,*[ p1, k1, p1, k5] repeat from star around, ending p1, k1, p1, k2

Continue knitting in this pattern until 4 ½ diamonds have been knit down the back of the sock leg (i.e. directly in line with your beginning of round stitch marker). End with round 10. Then begin the heel flap.
Heel flap:
R 1: Knit 18 (20) sts, then turn
R 2: sl 1, Purl 35 (39) sts, turn.
At this point, arrange the stitches you’ve just worked on one dpn, and the remaining stitches on another dpn. Leave these unworked stitches alone while you knit the heel. They will become the instep stitches. In fact, if you can, cap the ends of that needle, or fit a holder over it, so you don’t lose the instep stitches when pulling your work out of your knitting bag. I speak from experience. Continuing on the heel sts:
R 3: [sl 1, k1] across heel sts
R 4: sl 1, p across heel sts
repeat rows 3 and 4 until you have 17 (19) slipped stitches along each edge of the heel flap.
Reset stitch counter or brain to row 1. Begin turning the heel.
Turning the Heel:
R 1: sl 1, k 19(21) sts, ssk, k1, turn.
(If you have never knit a sock before, you may be questioning this step, as there are still unknit stitches on the needle, this is correct, and although it is hard, go ahead and turn, and follow the heel turning directions line by line, and all should be well. If not, there are some very nice illustrated books on sock knitting that can help you with diagrams and explanation. I highly recommend Nancy Bush’s Folk Socks.)
R 2: sl 1, p 5, p2 tog, p1, turn
R 3: sl 1, k 6, ssk, k1, turn
R 4: sl 1, p 7, p2 tog, p1, turn
R 5: sl 1, k 8, ssk, k1, turn
(At this point you may have noticed that when you either p2 tog or ssk, you are doing so “across the gap.” You are welcome to continue each row by working to the gap, ssk or p2 tog, and then k1 or p1. If that doesn’t work for you, continue following the directions line by line. Either way you’ll end up in the same place.)
R 6: sl 1, p 9, p2 tog, p1, turn
R 7: sl 1, k 10, ssk, k1, turn
R 8: sl 1, p 11, p2 tog, p1, turn
R 9: sl 1, k 12, ssk, k1, turn
R 10: sl 1, p 13, p2 tog, p1, turn
R 11: sl 1, k 14, ssk, k1, turn
R 12: sl 1, p 15, p2 tog, p1, turn
R 13: sl 1, k 16, ssk, k1, turn
R 14: sl 1, p 17, p2 tog, p1, turn
smaller size only:
R 15: sl 1, k 18, ssk, turn
R 16: sl 1, p 18, p2 tog, turn
R 17: sl 1, k19 DO NOT TURN
larger size only:
R 15: sl 1, k 18, ssk, k1, turn
R 16: sl 1, p 19, p2 tog, p1, turn
R 17: sl 1, k 20, ssk, k1, turn
R 18: sl 1, p 21, p2 tog, p1, turn
R 19: sl 1, k 23 DO NOT TURN
Pick Up For the Gusset:
Divide your heel sts between 2 needles. The beginning of your round is now between these 2 needles. Think of these as needles 4 and 1. Along the edge of the heel flap using needle 1, pick up and knit the back loop of the 18 (20) edge stitches. Now reach down to the row below the last stitch picked up, and pick up that stitch too. This prevents the small hole that would have otherwise formed at the corner of your heel flap. Using a free needle, which will become needle 2, knit across the 18 (20) instep sts, continuing in the diamond pattern (round 11). Using a free needle, which will become needle 3, pick up and knit 19 (20) sts along the other side of the heel flap, beginning with the “extra” stitch from 1 row below. After picking up the stitches, still using needle 3, knit across the 10 (12) sts on needle 4. You now have all your sts arranged on 3 needles, leaving the 4th as your working needle.
That was just one round. Whew!
Gusset decreases:
Again, reset stitch counter or mind to round 1
R 1: k across needle 1, continue diamond pattern across needle 2, knit across needle 3
R 2: Needle 1: k to last 3 sts, k2 tog, k1.
Needle 2: Continue diamond pattern
Needle 3: k1, ssk, k to end of needle.
Continue alternating between rounds 1 and 2 until you have decreased back to the original 72 (80) sts. Continue down the foot, knitting all the sts on needles 1 and 3, and continuing the diamond pattern on needle #2.
When the foot is 2" shorter than its finished length begin the toe decreases. If you aren’t making these for yourself, or haven’t been able to measure the recipient’s foot, here’s a pretty good idea of men's foot lengths based on shoe size:

Toe decrease:
Reset stitch counter, or brain, to round 1.
R 1: Needle 1: k to last 3 sts, k2 tog, k1.
Needle 2: k1, ssk, k to last 3 sts, k2 tog, k1.
Needle 3: k1, ssk, k to end of needle.
R 2: k (Yes, you’re done with the diamonds now.)
Repeat rounds 1 and 2 until there are 36 (40) sts total.
Repeat round 1 until there are 16 sts total.
Knit across needle 1 and break yarn, leaving a 12" tail.
Use kitchener stitch to graft the remaining sts together.
Work in ends, and block.

Buffalo Guys' Diamond Socks–The Short Form
This pattern is brief, for the experienced sock knitter who just wants the stitch pattern and a few useful numbers. If you have not knit very many socks, you may want to use the Well Explained pattern.
Sized to fit ankles 9 ½-10, (10 ½-11) inches in circumference
Lengths given for men’s shoe sizes 6-14
Gauge: 9 sts per inch
Needles: 1 set of double points in correct size to obtain gauge. (I used zeros, I knit loose. Do a swatch, it’ll make things go better for you later, honest.)

Instructions:
Cast on 72 (80)sts. (If you know how, cast on in ribbing for 2x2 rib. If you don’t know how, don’t worry, any stretchy cast on you already know will be fine.)
Rib for 20 rounds.
Begin diamond pattern:
R 1: p1, k3, p1, k3, repeat around
R 2: p1, k3, p1, k3, repeat around
R 3: k3,*[ p1, k1, p1, k5] repeat from star around, ending p1, k1, p1, k2
R 4: k3,*[ p1, k1, p1, k5] repeat from star around, ending p1, k1, p1, k2
R 5: k2, *[p1, k3, p1, k3] repeat from star around, ending p1, k3, p1, k1
R 6: k2, *[p1, k3, p1, k3] repeat from star around, ending p1, k3, p1, k1
R 7: k1, *[p1, k5, p1, k1] repeat from star around, ending p1, k5, p1
R 8: k1, *[p1, k5, p1, k1] repeat from star around, ending p1, k5, p1
R 9: p1, k3, p1, k3, repeat around
R 10: p1, k3, p1, k3, repeat around
R 11: k1, *[p1, k5, p1, k1] repeat from star around, ending p1, k5, p1
R 12: k1, *[p1, k5, p1, k1] repeat from star around, ending p1, k5, p1
R 13: k2, *[p1, k3, p1, k3] repeat from star around, ending p1, k3, p1, k1
R 14: k2, *[p1, k3, p1, k3] repeat from star around, ending p1, k3, p1, k1
R 15: k3,*[ p1, k1, p1, k5] repeat from star around, ending p1, k1, p1, k2
R 16: k3,*[ p1, k1, p1, k5] repeat from star around, ending p1, k1, p1, k2

Continue knitting in this pattern until 4 ½ diamonds have been knit down the back of the sock leg (i.e. directly in line with your beginning of round stitch marker). End with round 10. Then begin the heel flap.
Heel flap:
worked over half the sts
R 1: Knit 18 (20) sts, then turn
R 2: sl 1, Purl 35 (39) sts, turn.
R 3: [sl 1, k1] across heel sts
R 4: sl 1, p across heel sts
repeat rows 3 and 4 until you have 17 (19) slipped stitches along each edge of the heel flap. Reset stitch counter or brain to row 1. Begin turning the heel.
Turning the heel:
R 1: sl 1, k 19(21) sts, ssk, k1, turn.
R 2: sl 1, p 5, p2 tog, p1, turn
continue working in this manner: sl the first st, work two together across the gap, work one more stitch, then turn
Continue until all heel sts have been knit.
Pick Up For the Gusset:
With needle #1 pick up and knit the 18 (20) slipped sts along the edge of the heel flap. Now reach down to the row below the last stitch picked up, and pick up that stitch too. This prevents the small hole that would have otherwise formed at the corner of your heel flap.
Continue working the diamond pattern (round 11) across the instep sts on needle #2. With needle #3, pick up and knit 19 (21) sts along the other side of the heel flap (including the “extra” to prevent a hole) and then continue across half of the heel sts. Slip the remaining heel sts to the beginning of needle #1.
Decrease Gusset :
Next round, k across needle 1, continue in the diamond pattern across needle 2, k across needle 3.
Decrease round:
Needle 1: k to last 3 sts, k2 tog, k1
needle 2: continue in the diamond pattern
needle 3: k1, ssk, k to end.
Alternate between the plain round and the decrease round until you are back to 72 (80) sts total, working the bottom of the foot in plain stockinette and continuing the diamond pattern over the top of the foot.
When the foot is 2" shorter than the desired length begin the toe decreases. If you aren’t making these for yourself, or haven’t been able to measure the recipient’s foot, here’s a pretty good idea of men's foot lengths based on shoe size:

Toe decrease:
Reset stitch counter, or brain, to round 1.
R 1: Needle 1: k to last 3 sts, k2 tog, k1.
Needle 2: k1, ssk, k to last 3 sts, k2 tog, k1.
Needle 3: k1, ssk, k to end of needle.
R 2: k (Yes, you’re done with the diamonds now.)
Repeat rounds 1 and 2 until there are 36 (40) sts total.
Repeat round 1 until there are 16 sts total.
Knit across needle 1 and break yarn, leaving a 12" tail.
Use kitchener stitch to graft the remaining sts together.
Work in ends, and block.

Subscribe to:
Posts (Atom)
