Showing posts with label do it yourself. Show all posts

Sunday, November 28, 2021

How I Plan My Garden Part 3: When do I start my seeds?

In Part 2 I decided what I wanted to plant, based on my big picture goals.  In Part 1 I took a good look at last year's garden to decide what I want to repeat this year, and what I want to change.  I'm ready to buy seeds.  I know what in planting and how many, but when do I plant?

Good news!  Starting seeds happens progressively through winter and spring, depending on the type of seed, not all at once.

Most seed packets include basic instructions around planting time, and many of these instructions reference your "last frost day" or planting before or after "all danger of frost."  Thankfully, that's an easy to find date.  It's the day in spring when you're likely to have one last frost before temperatures stay above freezing for good. Type your zipcode into a calculator like the one here at Dave's Garden and then take note of the date around the 30% chance, to be safe.  Once that day comes, you'll need to look at your weather forecast to see if it's really the last chance of frost, but for now it's a date to count back from so you'll have plant-able seedlings when the time comes.

I mark this day on a wall calendar, and mark every week before it, going all the way back to midwinter.  This way when I read, "start 6 weeks before last frost" I can easily flip to the week marked six and make note of which seeds need to be started then.


Last year I bought a nifty "perpetual calendar" from Fruition Seeds that gives space for three columns after each date.  Each column is a year, so I can easily move information over from one year to the next.  You can see entries here for two years, last year and this.


I sort through all the seed packs, find the information on when to start, and then write it down on that week.  This way, I only have to figure this stuff out once and then look it up each week, instead of counting on my memory (dangerous) or re-sorting through seed packs every week wondering, "do I need to start any of these today?" which would certainly take a lot of the fun out of this hobby.

Once they're all noted on the calendar, I physically lay the packets out in order of planting week.  Once they're in order, I put them back into storage in order, behind little cards noting the date.  Every week I check the calendar "what do I get to start this week?" and then go into the seed box to pull out a preset collection of seed packs.  I also write planting dates on the calendar, and hardening off dates 2 weeks before each planting date.


So what about seeds whose planting date references something other than last frost?  Like tomatoes, which are to be planted, "once the soil has warmed to 50*F" or "once the nighttime lows are reliably over 50*F."?  Sure, when the time comes I can read a forecast and a soil thermometer with the best of them, but without a time machine I can't then go back 8 weeks and tell myself, "time to start the tomatoe seeds."  This is where it's great to find other local gardeners.  Ask in local online gardening forums and in local garden shops,* "When is it safe here to plant tomatoes, beans, peppers, etc?"  

If you are starting with seedlings, not seeds, it's still good to organize your purchasing and planting around a calendar.  peas and greens can take some frost or even snow, especially if you're directly planting the seeds into your garden, but tomatoes and peppers need to wait until much later.  There's never just one day to put in the full garden if you're growing more than one kind of vegetable.  I find it's well worth it to spend a few hours on a winter holiday break to set up the calendar just once, and then follow the plan from there forward.

A few words about aquiring seeds:  Seeds last for years.  Don't feel you have to use up the whole packet the same year you buy it.  Store what you don't use this year for the future.  The most important thing about seed storage is keeping them dry.  Save silica packets (those little rectangles that say "do not eat") from shoes, vitamins, etc and put them into the same well sealed container as your seeds.  For really long lasting seeds, store the sealed container in the freezer.  How long seeds last depends on the type.  There are lots of handy charts for that, including this one from The Spruce.


If you are purchasing seeds, buy them from a reputable seed company or that local garden shop.  I've heard a lot of stories of people getting screwed buying seeds from amazon or ebay.  Personally, I wouldn't.

There are lots of free seeds in the world!  Starting with that packet you saved from last year.  Save the seeds you grow.  It's a huge topic, and the process can be very different from one plant to another, but tomato, pepper, and dried bean seeds are among the easiest to save and a great place to start.  You may also have a local seed library.  Ask around, do an internet search.  The added benefit of getting seeds that your neighbors have grown out and donated to a seed library is that you know for sure that someone has grown them successfully in your area.  I start the calendar process with the seeds I already own, as that helps me figure out what's missing that I'll need to find or purchase.

One last word about seeds:  you cannot accidentally buy GMO seeds.  Lots of seed companies state that they aren't selling GMO seeds, with wording that implies that maybe somebody else is, but in reality, GMO seeds are proprietary, and you need to pretty much be a farmer, and definitely sign a contract to buy them.  Please don't just take my word for it, after all I'm some lady on the internet you've never actually met.  Instead, here's an article from the garden professors, and one from gardening know how.  There's lots more out there if you're interested in searching for them.

I hope that this short series has helped you get on top of garden planning.  It can be overwhelming to narrow down what you want and where to start, but once you have a routine down it's very easy to adjust and repeat.  I'm especially hoping this is helpful to all the new gardeners of the last few years, and helps you enjoy more and worry less!

*Local garden shops, not the garden section of big box stores.  Why?  Because the employees there have to be ready to work in any department, and just because someone is working in the garden section that day, doesn't mean it's their area of expertise.  My career is in building costumes for theater, dance, and opera.  I'm an excellent tailor and seamstress, and right out of college I worked in a large corporate fabrics and crafts store.  I could have been a great source of advice for anyone who had questions about sewing clothing.  In two years, I maybe got that question once.  Instead, thanks to that guy Murphy, I got asked about glue, and embroidery, and scrapbooking, which I know nothing about.  My co-workers who could have answered the glue question got the clothing question on my day off.  So if you have a question in a big box store about gardening and the employee doesn't know, don't hold it against them.  You're probably talking to someone who is an expert in plumbing or paint.  Better to build a relationship with the employees in a local garden shop, who focus exclusively on gardening, and garden in the same region as you do.

Sunday, February 28, 2021

Replacing peat moss with PittMoss

 Recently, I've been looking for a way to replace peat moss.  I have been using it as a major component of both potting mix and seed starting mix.

I've found it difficult to really get good information on how sustainable the harvest of Canadian peat is.  I fully admit that intelligent people have and will come to different conclusions about it's sustainability, based on the available information.  I've decided to find something that I can be sure has a smaller environment footprint, and doesn't threaten an ancient eco-system.  

Lots of people have switched to coconut coir.  If it's working for you, great!  You have my blessing.  For me there are three reasons I'm not impressed.  One is that I've seen other gardeners do comparisons between starting seeds in traditional peat mixes and in coir mixes, and the plants in coir did terribly.  Downright sickly compared to the peat.  Second is that I'm not convinced that shipping coir halfway around the world is more sustainable than responsibly harvested peat from my own continent.  Finally, if coir can be a useful soil amendment, I have issue with removing organic soil nutrition from poor nations and further stripping their agricultural wealth.  

So yeah, that's a no for me on coir.

A few years ago I heard about a peat substitute being made out of waste paper near Pittsburg.  It's called PittMoss, because it's like peat, but made in Pittsburg, get it?  So right away that ticks some environmental boxes for me.  It's using a waste product, so not only is it not being harvested from a threatened ecosystem, it's also taking garbage out of the wastestream.  And it's being manufactured practically in my backyard compared to far northern peat bogs or Asian coconut trees.

I had to try it.

My garden is my science outlet, so I love setting up good, single variable, side by side comparisions when I have a question I want to answer.  I mix my own seed starting and potting mix in order to save money, have control over the ingredients, and make a lot at one time.  So my standard mix is: 1/3 compost, 1/3 perlite, 1/3 peat, and a small amount of ash to correct the acidicy of the peat.  Using 5 gallon buckets for the big components, an old tea cup of wood ash is enough, as pictured.


Mixed:


Then I mixed the trial version:  1/3 compost, 1/3 perlite, and 1/3 PittMoss Prime.  No ash as Pitt doesn't need the pH corrected.


This is the PittMoss Prime.  Up close it has some bits of color.


I started this trial on May 28th with my tomatoes.  I chose well matched seedlings in terms of size and color, two of each variety.  For each pair, one was planted into the peat mix, and one into the Pitt mix.  A little more than 2 weeks later, on June 14th, there was a marked difference in size and fullness of the plants in each pair.  The healthy plant is the peat, the stunted is the Pitt.  


Hm.  Looks like a lack of nutrition.  So I added a top dressing of two inches of compost (under the straw) to all of the plants, Pitt and peat alike.  From that point forward, the Pitt plants filled out and looked healthy.  They stayed smaller than the peat, but grew at the same rate from there forward.  Ok, so maybe this parallels the trouble I've seen with coir, and is evidence that peat moss contributes more nutrition than we tend to give it credit for.  The next step of my comparision was seed starting.  I continued to use the same peat mixture, but changed the Pitt mixture to:  1/2 compost, 1/3 perlite, and 1/6 Pitt, or 1 bucket compost, 1 bucket perlite, and 1 bucket half PittMoss Prime and half compost.

I thought for sure I had solved it--just needs a higher proportion of compost--but as I trialed seedlings side by side, they germinated at about the same time, grew to the point of their first true leaves, then while the peat seedlings continued to grow, the Pitt stalled out at this size.  These are thyme seedlings that illustrate this, along with another really interesting result, which is that when I plant 4-10 seeds in each mix, I am often getting one or two more germinating in the Pitt than in the peat.  So it's not bad stuff, but clearly there's something else the mix needs to be successful.


I was stymied, so wrote to the PittMoss company.  I showed them the pictures.  They said, "I'm going to have one of our soil scientists get back to you."  Really?!  A soil scientist?!  Woohoo!  The soil scientist was most interested in the tomato pictures.  From his email:

"From the photos it is apparent that there is a significant nutrient deficiency in the blend with the Pitt Moss Prime.  It appears by the purpling of the leaves that there is clearly a phosphate deficiency and possibly the small size indicates nitrate deficiency as well.  The fact that the compost increased the growth rate is significant.

"As a basis for what was likely taking place remember that PittMoss Prime has no inherant nutrient supply while it has a very high nutrient holding capability once the nutrients have been applied.  The blends of Plentiful and Performance have nutrients supplied in the formulation...When blending other material with PittMoss Prime it should be remembered that the high carbon content of the Prime will also require a high nitrogen addition to balance the demand...I susupect that by adding a good balance of fertilizers and or manures with some compost the end product will be similar to what we produce in the PittMoss Plentiful and Performance...If continuing to use PittMoss Prime I suggest both composts of good quality and some dehydrated poultry manure for the organic grower.  Otherwise soluble plant food..."

The carbon was tying up the nitrogen!  Of course!  So with that knowledge, I've begun fertilizing the Pitt seedlings with a dilute fish and seaweed fertilizer once a week.  This is standard practice for many seed starters, but because I use a mix with compost (a bit unusual for seed starting) I had been getting by without it.  Certainly not a problem to add it into my routine now.

After a few weeks of seaweed, the seedlings look good and are growing at a better rate.  In the case of my broccoli seedlings, the Pitt seedlings have completely caught up to the peat, and some are now bigger!


Blue pots on the left are the Pitt, right is peat.

Conclusions:  I'll continue this comparison through my seed starting this spring, but with the addition of fertilizing the Pitt seedlings with half strength fish and seaweed fertilizer once they have their first true leaves.  Based on the broccoli, I expect this to go well and think from here forward I will be using PittMoss for my seeds and container plants.  Next year I plan to trial the two different proportions of the Pitt mixture against each other.

2022 Update:  I did indeed do another trial, this time comparing a mix of 1 bucket each of PittMoss Prime, compost, and perlite, PLUS 2 tea cups of feather meal to PittMoss Plentiful right out of the bag.  Either/both of these worked beautifully!  The plants are much healthier this way and didn't need any supplemental liquid fertilizer.  I think this is because as the email from PittMoss soil scientist Dr. Bethke points out above, the additional nitrogen was needed not for the plants' direct use, but to balance with the carbon content of Prime.  Plentiful already contains the small amount of nitrogen I had to add to Prime, so from here forward it will be my go to, either on it's own or in the mix.  As PittMoss is getting more popular, it's nice to know that if they run out of Plentiful, I can get the same results using Prime as long as I mix two cups of feather meal (or other high nitrogen organic granular ferilizer) into every 5 gallons of Prime. 

If you do decide to compare one of these options to your old seed starting mix, I'd love to see your results!  Please share in the comments.

I've found PittMoss for sale from their own website, www.pittmoss.com from A.M. Leonard www.amleo.com and of course on Amazon.


Monday, April 25, 2016

Chickpea Cheddar Biscuits


I've been experimenting with several recipes to make a really good grain-free biscuit.  There are other cheddar biscuit recipes out there, but I believe this to be an improved version.  I love to eat these with soup, or split in half and use them for a breakfast sandwich or in place of the English muffin with eggs benedict.

Chickpea flour is the same thing as garbanzo flour or gram flour or besan.


Makes 5 really hearty biscuits.

Preheat the oven to 500*F  Butter a 6"-7" oven safe dish or ramekin.

Combine in the bowl of a food processor:

  • 1 C chickpea flour
  • 1 1/2 tsp baking powder
  • 1/4 tsp baking soda
  • 1/4 tsp salt

Pulse a few times to mix.  Cut into approx. 1/4 pieces and add to the food processor:

  • 2 T butter

Pulse 8-10 times to incorporate the butter.  You may still see small chunks of it, and that's ok.  Pour the contents of the food processor into a medium sized mixing bowl and add:

  • 1/2 C buttermilk or yogurt
  • 1 C shredded sharp cheddar

Stir with a rubber spatula until you have a consistently wet, sticky, lumpy dough.  Place about a 1/4 cup of chickpea flour in a bowl and line up the bowl of dough, followed by the bowl of flour, and then the buttered oven safe dish.  Use a 1/4 C measuring cup to scoop dough out of the first bowl.  Drop it into the flour and roll it around to coat, then toss it gently from hand to hand over the bowl to shake off any excess flour.  Place it into the buttered dish.  Continue with the rest of the dough, arranging the biscuits touching each other in a circle in the dish.  You'll make about 5 balls total.

Bake in the 500*F oven for 5 minutes, then turn the temperature down to 450 for an additional 12-15 minutes.  They are done when golden with some browning on top, and cooked all the way through.  Turn out onto a plate to cool, and break the biscuits apart when cool enough to handle.


These are a bit too crowded in only a 5" dish.  If you make a double batch, a 9" pie plate will hold them perfectly.

Monday, January 14, 2013

Stuff That Lasts


No, I’m not writing about love, faith, friendship, or any of that great stuff.  I really do mean STUFF that lasts.  Yes, it’s shallow and soul killing to be materialistic, but there’s lots of stuff that’s necessary to life and not materialistic at all, like tools, warm clothing, food, and shelter.  That kind of stuff.

It all started with a new pair of shoes.  Truthfully, it started before that, with a worn out pair of shoes.  I despise malls (a post for another day, I’m sure) so I began looking for a new pair where I always do, online.  The shoes I wear the most, especially for work, are Doc Martens.  I stand for most of my 8-12 hour day, and Docs have been the very best shoe for me to do that in.  Add to that the practicality of being long lasting (5-12 years for most of mine) and the fact that the boots make me look cooler than I am, and it’s a win.  While searching, I read some of the comments. (I know, never read the comments.)  Several said something like, “they’re OK, but not as good as my old Docs that were made in England.”  It could be the rosy glow of nostalgia, could be imagined after seeing that they were made in the third world, or could be true, either because they’re made in the third world, or because the whole product line is being made differently than it once was, regardless of where the factory is.

I decided to investigate.  I went to the Dr Martens site and found some interesting information.  Most of their shoes are made in Thailand.  They have a great statement explaining their take on social responsibility and how they work with their Thai factories.  More interestingly, they carry a line of Made in England footwear.  Each item is a little more expensive, but that would be worth it if the commenters are right about the better quality.  Then I found a glorious thing, a section of the website titled For Life.  Isn’t this what I really want?  I mean, I’ve known for years that Dr. Marten and I have made a lifetime commitment, but up until now it was only common law.  Here was the chance to make it official.  Yes, you can buy a pair of Docs that are guaranteed for life, and will be repaired or replaced for free (plus a handling fee to mail them to England).  But here’s the thing, they’re not made in England, they’re made in Thailand.

So begins the soul searching.  Why do I think I prefer products made in the first world to those made in the third?  I certainly made this choice when I bought a car.  I try to do it other times too.  This isn’t about American labor, which I’m part of, since the options are England or Thailand.  There’s nothing inherently wrong about employing Thais.  I’m sure they’re good people.  They have to be to make, eat, and appreciate such good food.  They need jobs just like the rest of us.  For me it boils down to 3 things.  First world countries generally have the highest safety standards for their workers, I abhor supporting companies that move their manufacturing to the third world in order to save money by no longer complying with those safety standards, and I tend to believe that the quality is better from a first world factory.  But let’s examine that last one.  Here’s a company that has gone out on a limb to guarantee a product for life, including free repair or replacement if/when it fails.  That’s a big promise, and one that could cost them money.  It’s to their advantage to make these their very best made shoes.  In fact, they go into some length about what they’ve done to make these a top quality shoe.

Assuming that Dr. Martens is following their own policy about factory conditions, there’s no inherent virtue in employing the English over employing the Thai, and in the long run, I’m most interested in getting a shoe that will last for more than 10 years before it needs to be replaced.  My first replacement pair will put me ahead of the game financially (i.e. For Life costs more than a standard shoe, but less than twice as much) and more importantly, the longer my shoes last, the fewer of them I’ll have to send to the landfill over the course of my life.  For me this is the best part of a lifetime guarantee.

I became environmentally aware? conscious? nut job? somewhere in the range of 10-12 years old.  It was the mid-eighties and the biggest environmental issues were energy use, land use, and landfill space.  I was really engaged by the last two.  Our planet is only so big, and frankly has too many humans using and disposing of too much stuff.  Land use issues are the main motivation for my vegetarianism, recycling, composting, and a part of why I have chosen not to breed.  It’s also why I’ve replaced many of the disposable items in my life (paper towels, tissues, cotton balls, “feminine products”) with washable, re-usable items.  At the age of 12 I would have happily informed you that disposable diapers take up the most landfill space, with “feminine products” in second place.  Now everyone is on about carbon footprints, but that’s only part of the issue.  Someone did a study claiming that disposable diapers and cloth diapers had the same carbon foot print, so it was ok to use disposable.  I’m sorry; did we suddenly double the size of the planet?  Where do they think we have room for another big pile of disposable diapers?

As you can see, I’m passionate about making as little garbage as I can, so I went with the lifetime guarantee.  And I can tell you, I’m not sorry.  In addition to being made of long lasting materials, and built to be repaired (many cheap shoes are not) they come with Dr. Martens Wonder Balsam and an extra set of laces.  Both pairs of laces have metal aglets!  I’ve never seen shoe laces with metal aglets before!  Talk about built to last.
After reading the little booklet about taking care of my new purchase, I got excited and cleaned and polished all of my Docs. 

 All my Docs clean, wonder balsamed, and polished

Aren’t they pretty?

The Wonder Balsam is aptly named.  I can’t believe the difference it made for my shoes.  They all look like new again, even the sandals and the short black boots, which are both about 10 years old now.

All my Docs clean, wonder balsamed, and polished

As much as possible, I try to choose the longest lasting option when buying stuff.  I’m willing to pay more if it means I’m buying the thing once instead of once every few years.  So I own a Rainbow vacuum cleaner that I expect to outlive me, and a Mini Cooper I hope to drive for 20 years…you get the picture.  And I’ve been taking care of the stuff I already own—making it last, just like the shoes.  I’ve been fixing stuff around the house that got mysteriously chewed.  I “re-soled” my felted slippers.  I’ve made arrangements to have my vintage mechanical watch fixed.  Oh, and speaking of lifetime repair or replacement guarantees, I may have just bought rather a lot of Tupperware.

Thursday, November 24, 2011

Finished

knitter on the roof

We finished the roof, and before the snow flies!

And no, there wasn't anything else I was supposed to be doing at this point. I was waiting for Billy and Chris to finish the chimney flashing so we could shingle around it.

Next year we build the dormer on the other side.

Saturday, October 15, 2011

Home Improvement

We bought our house almost 2 years ago, knowing that it desperately needed a roof. We moved in 2 1/2 years ago naively thinking that a. buying a house could be done in a month if all parties were willing, and b. we would put a new roof on it as soon as we owned it, that very summer.

So we started working on the roof about a month ago.

It is important to note that since it's construction in the early 40s, our house has been owned exclusively by monkeys who insisted on making all repairs and additions themselves. We knew that the most recent monkeys were also hillbillies based on all the skoal cans, light beer cans, and perfectly useful tools we had to pick up just out of site on the other side of the fence. But now we know it's monkeys all the way down.

Chris and his brother and their friend climbed up on the roof about a week ago (after partially fixing our wiring so that the power tools would work, setting up traps for the possum/large rat living in our garage, and installing decent locks on all the garage doors because apparently people drive around looking for houses being worked on and then go in the garage and steal your tools. Classy.). They knew that there were 3 layers of shingles on the roof, which is against all sense and regulation and began doing a complete tear down. Turns out, there are actually 4 layers of shingles on the roof. This means that every roof including the original must be on there, and because every layer is cheap and installed poorly, no single layer "lasted" over 20 years. As a bonus, I found the one white shingle on the whole roof buried in the first layer, so either I get a prize or it's one of the first signs of the apocalypse along with a perfect red cow and the rebuilding of the temple in Jerusalem.

Anyway, as I may have mentioned, monkeys. Apparently the charming spot where our kitchen sticks out from our otherwise square cape cod is an addition. To add it meant cutting away a section of the (logically) load bearing outer wall, but apparently adding back in the proper support for the roof was less than obvious. So now the guys have to fix our sagging roof which has been carrying twice the allowable weight of shingles for the past 10-20 years. Which means I came home to this:

IMG_1093.JPG

The basement has been jacked-up and re-enforced, and then the kitchen, so that the roof can be jacked up and permanently re-enforced. Fun.

As soon as the shingling starts I'll be right up there working with them. Until then, don't think I don't appreciate all the work these guys are doing but I'm really not sure how we're supposed to get any silverware out of that drawer...

drawer access

Sunday, March 01, 2009

Look Ma, I Made a Wort Chiller

I can't help but do it myself. I don't know what in my life brought me to this point; I'm sure some of it is German frugality, but if I can figure out how to make something instead of buy it, and it will save me a few bucks to do so, you better believe I'll make it. I already make my own beer, but I've been lusting after a wort chiller for a while now. For those who don't brew, a wort chiller is a means of quickly cooling boiling wort (beer before the addition of yeast and therefore alcohol) to a temperature of about 75* F. This needs to happen quickly because the wort is designed to be an attractive food source for yeast, and is therefore also an attractive food source for every other microorganism in the house. So as soon as it's cool enough one needs to inoculate the wort with the beer yeast so it can out compete any other microorganism that's looking for a free ride.

Right now wort chillers are selling for $60-$120 in the store, and I just haven't felt I had the capital to spend on one, but a few weeks ago I was thinking about it again, so I grabbed a brewing book with instructions for making one and tagged along to the hardware store. I meant just to price the materials, but when I saw that I could make my own wort chiller for about $35, and we had a 10% off coupon, I was sold.

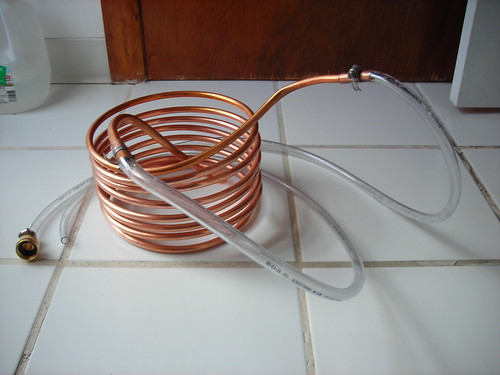
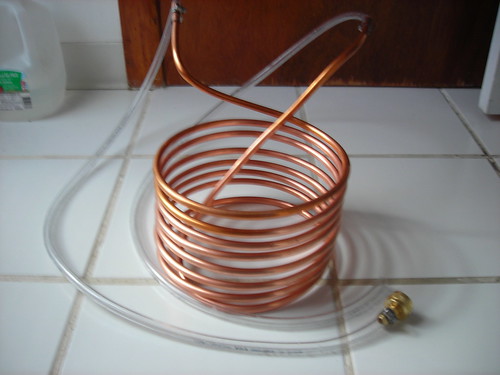
It took $35, a screwdriver, and 20 minutes, and behold:
Up until this point I've used the fairly cheap method of setting the pot of boiling wort into a sink full of cold water and changing the water every few minutes. This take 30 minutes to an hour to cool from over 200*F down to 75*-80*F. I figured a wort chiller would make that just a little faster. Boy was I thrilled when I used it last weekend and discovered it only takes about 10-15 minutes! I was almost resentful of not having enough time to clean up while cooling my wort. Almost.

Instead of placing the brew pot into a sink full of cold water, now I set the copper coils of the wort chiller down into the brew pot for the last 15 minutes of the boil (to sterilize it). Then I just remove the pot from the heat, hook up one end of the wort chiller to the faucet, make sure the other end is set to drain into the sink, and turn on the cold water. Brilliant! I wish I had made this thing 2 years ago!