Sunday, December 16, 2007
Nostepinne: Fiber and Woodworking
When Scott asked what I wanted to make, the first explanation I gave him was "a fancy stick." An apt description, yes? This is an ingenious and very old Scandinavian tool for winding a perfect center pull ball of yarn. Mine is made out of tulip wood and includes my addition of a yarn gauge at the end of the handle.
It's hard to tell from the photo I snapped quickly at work, but that is a perfect little ball of yarn that looks like it came off a ball winder. and look at the beautiful grain on that wood! I have enough wood for a second nostepinne, so I am refining my design and will start another, maybe in January.
Does This Make My Ass Look Big?
The right side of the photo will give you some sense of the size and shape of the actress before padding.
I started with a muslin base fitted to the actress, and then built onto it with filter foam (used in AC, air purification systems, etc). Because the filter foam is very open, it will dry quickly after washing.
I try to form padding in sections, partially to best mimic how flesh sits on the body, and partially to allow the padding to move with the wearer's body--so that they don't just look like they've stuffed pillows down their shirt!
I covered the padding with another layer of muslin, so it's a simple unit, easy to clean and wear, with a zipper up the back. In most cases I would make this cover in spandex to be smooth and skin-like, but in this case I wanted a firm woven cover to mimic a hearty undergarment. We did add spandex sleeves with a little padding to add just a little waddle to her otherwise too thin arm.
Finally I draped the actually costume over the padding. They are two pieces for the sake of laundry, but go on as one for the sake of the dresser. The actress, by the way, was thrilled to wear it! So gratifying for us, as some actresses have been made so insecure by years of auditions and agents that they might refuse to go on stage in a fat pad, or insist that the program note that they are padded and not actually fat. Hooray for the secure actresses!
Thursday, November 22, 2007
Wedding Photos
Anyway, here they are! These are a few of our favorites, but to see the whole batch, click here. I suggest using the "view slide show" option in the upper right if you want to view all of them.
This seems to be the best view of the infamous bunny stole.
Thank you to everyone who was able to come share our wedding day with us, especially folks who had to travel or rearrange their schedules to be there. We both really appreciated it.
Sunday, November 18, 2007
Free Watch Cap Hat Pattern
Yarn: knit holding 2 strands together of a good superwash wool. I've used lambspride super wash, Cleckheaton Country 8 ply, or Classic Elite's superwash. Use 3 balls.
Needles: size 8 16" circular needles and size 8 double point needles.
Gauge: 3 3/4 sts per inch in stockinette on size 8 needles, or size needed to obtain gauge. Be sure to check your gauge--I knit loose!
Sizing: small to fit head size 20 to 21 1/2. medium to fit head size 21 1/2 to 22 1/2. large to fit head size 22 1/2 to 24
Pattern Stitch:
Round 1: *p1, yo, sl 1 pwise wyib, rep from *.
Round 2: *yo, sl1 pwise wyib, k2 tog, rep from *
Round 3: *p2 tog, yo, sl1 pwise wyib, rep from *
Round 4: * yo, sl 1 pwise wyib, k2tog, rep from *
repeat rounds 3 & 4 for the rest of the piece.
*note As you get the hang of knitting brioche stitch you'll find that you can make the yarn over and the slip one immediately after it in one movement. You'll also find that knitting or purling these two together can be done in basically one movement. After a few rows, brioche becomes a fairly fast and easy stitch to knit.
Pattern: For s (m, l)
Cast on 52 (54, 56) sts. Join, being careful not to twist. Knit in pattern until hat measures 9-9 1/2 inches long. End after completing a round 4. Remember that you only knit rounds 1 and 2 after the cast on, and knit the rest of the piece alternating rounds 3 and 4.
Once hat is 9 -9 1/2" long (depending on how deep you'd like the turn up) begin decrease rounds after completing round 4.
Dec Round 1: *p2tog, k1, rep from * around.
round 2: *p1, k1 rep from * around
round 6: *p3 tog, k1, rep from * End p3 tog, k1 ([p1, k1], [p3 tog, k1])
(switch to dpn's when there are too few stitches to comfortably fit around circular needle.)
rounds 7-8: continue in p1, k1 rib
round 9: *p3 tog, k1, rep from * End p1, k1 ([p3 tog, k1], [p3 tog, k1])
round 10: continue in p1, k1 rib
round 11: *p3 tog, k1, rep from * End p1, k1 (all sizes)
round 12: cut yarn to about 12" long, thread through yarn needle, run through remaining sts on needles twice, draw them together, run yarn to inside, knot off and weave in end. Weave in beginning end and any other ends in hat. Wash, block lightly without flattening stitches, and wear or donate.
California Bird Rescue
Sunday, November 11, 2007
Fleece Study: The Long Wools and Novelty Locks
I found conflicting information among my books (and one video) on how to make a boucle. I tried at least two before it worked. The sample on the left shows my first rather awkward efforts. On the right is a much more successful sample of boucle. I spun a few of the long wools as boucle, but couldn't take it any more. Man is boucle a pain to make! The first plying step, where you make the loops, is very time consuming as you carefully push up one ply to make all those little loops. Now I know I'll probably never spin enough boucle for a sweater, although it would be a nice accent, maybe as collar and cuff. After a few boucles I took a class at the finger lakes fiber festival. It was on spinning dyed locks, which are usually either long wools or mohair. Perfect! My favorite technique learned was to incorporate a lock at a time into a two ply yarn by placing it between the strands while plying and letting the twist lock it in. I love the look of this yarn. Here's what I did in class:I'll be interested to see how something like this knits up, with a few thick fuzzy stitches every so often. I did a few study fleeces this way too, but they aren't as visually interesting because they're all one color. My favorite of the boucles, and possibly of all the long wools was the Wensleydale x Cotswold.
It's long and shiny and soft, but still has the right texture to curl into boucle. This I might make enough of for a little something, maybe a scarf. Also, I've been meaning to show my exciting new tool. I found this in Delhi, south of Cooperstown, when I was out there this summer.
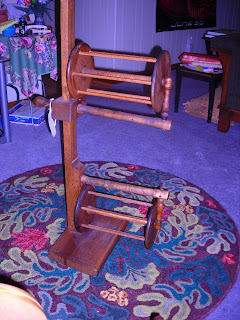
It's a squirrel cage swift--like any swift it holds your skein of yarn while you wind it into a ball. The skein is held vertically and the cages turn while you unwind. It's so smooth, and it's beautiful to look at, and I got it for a song. Hooray! Makes me want to do nothing but wind balls of yarn, but I'll have a new tool for winding yarn balls to show off soon.
Thursday, October 11, 2007
A Bit About Work
I did the patterning and fitting. Both of us researched the time period, Ann from a visual and cultural point of view, me from a pattern and structural point of view.
I'm very pleased with the results.
Wednesday, October 03, 2007
In Praise of EggSalad
When there is a problem, I have no idea how to solve it. Let's face it, most of us pass computer troubleshooting information the same way we pass diet information: we tend to talk earnestly about what worked best for our hairdresser's nephew, or what Aunt Mary swears by. My computer has been getting slower and slower since I bought it, for no discernible reason. I talked with friends and got all kinds of theories, but none seemed to apply. Now, I realize that being 5 years old, this computer is extinct, but even so, I'm only using half the memory and just starting up, without running any programs, was taking forever. Honestly, my spinning wheel went faster.
Luckily for me, one of Chris's closest friends, let's call him EggSalad, is a generous soul with a doctorate in computer science. His suspicion was that I had some sort of malicious software like spyware, and his advice was to do a full system restore. Actually, his advice was to bring it to him to do a full system restore. I am thankful and relieved that he did because
a) it was nerve-wracking as all get out because it involved wiping everything off the computer, and then starting over with re-installing windows, and
b) it took long enough to wipe and reinstall everything (like all those bloody windows updates) that I had enough time to knit the foot of this sock:and we all went for sushi while it loaded stuff. EggSalad is now my hero. He wanted no money for this, and even offered to pay for our dinner because we had travelled an hour and a half to do this and it was my birthday. We didn't let him. Anyone else with his qualifications would have charged us approximately my week's pay.
Because of EggSalad, now when I start my computer it's like this
Thanks EggSalad, you know who you are!
Tuesday, September 18, 2007
Fiber Festival!!!!!!!
2) Audio book
3) Gift Certificate for one of the participating yarn shops. (Hooray for bridal shower gifts from astute friends!)
4) Knitting
5) Newly finished and first time worn woolen sweater, because Saturday was 10 degrees colder than any day in the previous or subsequent week.
This festival has everything, some of it twice, and all of it nice. Lots of beautiful yarn and equipment:
Winderwood Farm had lots of beautiful wooden equipment including wheels. Up on the shelf in back you can see a yarn reel and some lovely lazy kates.*
Goldings were there with their amazing carved wheels and spindles. Those are relief sheep's heads circling around that wheel and on the back of the chair.
The Bosworths were selling their ingenious book charkas and journey wheels. Incidental, I'm trying to convince Andras that he needs a charka. No, he doesn't spin, but he is a Buddhist, and recently purchased a ukulele, and somehow a charka just fits perfectly with that.
I saw and knitted on the current attempt to break the world's record for largest sock. The sock, like everyone else, has it's own blog.
Our fiber fest has the best fair food in the world. Tacos, salt potatoes, fresh squeezed lemonade, kettle corn, and the Artichokes French stand, which has 2 styles of artichokes and beans and greens. Their motto is that good food is neither fast or cheap, but it is good, and boy are they right.
There were great hooked rugs at some of the booths. I love that this sheep is swirly. I find the color choice in hooked rugs really compelling, as well as the way the color of the background often swirls around the foreground objects.
And best of all there were bunnies. This is a not yet full grown giant angora on the lap of the woman who created the breed. We had a great talk about bunnies and specifics of angora grooming, plus I got to pet all of her rabbits. Maybe Rusty needs a friend?
*Kate like Susan, was ingenious, which is never lazy.
Saturday, September 01, 2007
A Great Loss for Beer Lovers
Wednesday, August 22, 2007
Happy Birthday Ray Bradbury, You Old Goat!
Friday, August 03, 2007
I Finished!
The Best and yet another Jayne hat
Lots of women choose a maid of honor who's good at throwing parties, or picking out clothes, or running down the groom. I picked the best woman who I wanted at my side on that day, who would keep me in the right mindset and keep me calm as we finished making table favors and ran around to rehearsals and such. She did not disappoint. For instance, getting to the rehearsal in rush hour traffic and going the wrong way on the highway (I was the driver) meant that I was half an hour late for my own wedding rehearsal. As we pulled in and I was freaking out over that fact, Lisa turned to me and said, "a bride is never late, nor is she early, she arrives precisely when she means to."
She also got me into the dress, explained the laws of crinolines to Aaron, packed the emergency kit, and wore something with a pocket in which she stowed a handkerchief that I believe the entire wedding party used. And she sent me a morbid bunny as a shower present.
Our best man was Chris's best friend from college. He was by far the best choice to make a speech at our wedding. I was really moved by what he said about us and our relationship. That all left me feeling really pleased that Chris had talked me into knitting him a thank you gift. Behold, yet another Jayne hat (from the too soon cancelled Firefly series) on the internet. There are several patterns already out there on the web, and Chris and I re watched the full episode, pausing every time the hat was on screen. Man, these new-fangled DVD thingys pause mighty purty. Too bad the show has dramatic moody lighting or we could have counted the stitches.
The hat was mailed to the roughest character on the ship, the one who may mutiny in any episode, by his mother, and no one has the nerve to tell him how silly it looks. It was a bit of a challenge in that it's intentionally made badly, so I had to copy the bad knitting. Not being able to help myself, I still did a "jogless join" where the stripe color changes, which is a good thing since I accidentally put the join in front when I added on the ear flaps. Andras loved it so much he brought it to the wedding and made it part of his speech. Phil loved it so much that he keeps trying to take it from Andras.
Chris packed the hat as it was packed in the episode, complete with a copy of the letter from Jayne's mother laying on top. Here it is in a still from the actual show, you can judge how close we got.
Thank you to both of our best!
Monday, June 11, 2007
Wedding Origami
Chris is still planning to post wedding photos, or a link to them, here on the blog when he gets a chance.
One of my contributions to the wedding was origami. I learned origami from my Dad as a kid. He did stuff like take apart the paper airplanes his students threw at him to figure out how they were folded. He also taught me the "water bomb" which he may have learned the same way. At some point my Aunt Stephanie gave me an origami book for Christmas. I loved it, but was too young to understand the directions, so when I wanted to fold something from it, Dad would follow the directions and fold it first, then teach me. I would fold it a few times to memorize it, since I could not yet read origami directions.
The wedding origami began with flowers. At least one of these is in the original origami book. I've collected a few more books and most of a calendar since then.
At this point I got concerned that the bouquet didn't look like much, and would just look like we cheaped-out on flowers. I also started to remember that flower arranging is not necessarily one of my skills. All that concern, however, was unfounded. I split these into two groups, my bouquet and my maid of dishonor's bouquet, and then began to spread them out and intersperse them with "leaves" cut from banana leaf paper.
As it turned out, less is more, which I should have realized when it comes to anything Japanese. I mean, that is their aesthetic, right? A week before the wedding, I remembered that the guys usually have boutonnieres, and a few days after that some memory of Mother's having corsages started poking in around the corners of my brain. By then I had help folding from Lisa, who was a great maid of dishonor who can pinch hit on stuff like origami flowers. She and Aaron and Derrick are all really good at tying up candied almonds in net squares, too.
Also seen at the wedding were this warren of rabbits, standing in for table favors:
See that little brown guy in the lower right? He had quite the adventure that night. I think the bright green guy on the left ended up a little sloshed too. They were on each table to declare that we decided a donation to the House Rabbit Society was way better than table favors. Rusty agreed.
Sunday, April 29, 2007
Knitted Bust Dart Details
Having somehow forgotten that, my last post went on and on about the bust dart I add to close fitting sweaters without ever showing you what it actually looks like. The idea took me a while to get my head around, as a sewn bust dart is subtractive, but the knitted dart is additive. In the interest of full disclosure and clarity, here, finally, are some pictures.
The dart is added by using short rows. beginning at the side seam, I knit across the front to the opposite side seam, wrap, and turn (when knitting in the round there isn't a seam, just a friendly neighborhood stitch marker). I continue knitting back and forth across the front, making each wrap and turn before I reach the last wrap and turn on that side. It's a little like a "common heal flap" in that way. You keep turning before you've gotten to the end of the row. The last pass goes only from bust point to bust point, after which I knit back across the whole row, knitting each wrap together with the stitch it wraps around, and continue knitting around the sweater as I had been doing before the dart.
In the diagram, the short rows are represented by the shaded area. The red line show the bust point to bust point distance, which would be between 7 and 9 inches for many women.
For me, a 1 inch high dart is perfect. Of course, how many rows this works out to depends on your gauge. The cotton top was knit at a fine gauge, so I worked the dart over 12 rows.
As I mentioned in the previous post, I only need to add this dart in close fitting sweaters. It's also not necessitated by bust size as much as by posture. I discovered that I might need to figure out how to knit a sweater with more distance down the front than the back after knitting my first close fitting sweater "blouse" from a pattern in one of my late 1940's knitting books. I put the finished sweater on and it looked like this: Note the bloop. When the deep waist level ribbing sat level just below my waist, there was extra fabric left in the back that blooped out rather unattractively all across the back until it petered out below the bust. I had to block the everliving crap out of the sweater to force the extra length to shrink up in the back and not poke out. Not the most elegant solution.
So how do you know if you might benefit from modifying your sweater pattern to include a bust dart? And how deep do you make it? Well, if you have the problem pictured above, you can gently pin out the bloop across the back, and then measure the depth of what you pinned out. That's the depth you need to add in front. If you'd like to figure this out without first knitting an entire sweater that doesn't fit, you can measure yourself as pictured below.
Tie a bit of yarn (preferably acrylic that you've had since childhood or was given to you as a well meaning but misguided gift--this is not a job on which to waste cashmere) around your waist. This is represented by the red line. Your waist is the smallest part of your trunk, and is probably much higher than you are currently wearing your pants, especially if you are under 30. The yarn should go there on it's own when you tie it. If not, adjust it. This is usually an inch or so above your navel.
Now that you've discovered your waist, stand as you normally stand, and have someone measure from the top of your shoulder where the sweater's shoulder seam would be, down over your bust to the waist yarn. (Which is also waste yarn.) Then have them measure from the same point on your shoulder down your back to the waist yarn. The blue line shows these measurements; the notch at the top is your starting point for each. If these measurements are less than an inch different, you're probably fine and don't need to add a dart. If the front measurement is an inch or more longer than the back, you may want to add a dart that is as deep as the front is longer than the back. If you get a difference of more than two inches, and would not consider yourself buxom, you may want to remeasure and make sure that you are really at the top of your shoulder, and not shifted back slightly.
Luckily for all of us, knitting is stretchy and therefore a much less exact science than sewing. When all else fails, knitting can almost always be unravelled, refigured, and reknit. Feel free to experiment with this dart and let me know if you do and how it comes out--I'll use your findings when I write out the pattern some time in the next few months.
Saturday, March 31, 2007
I'm Ready For Spring!
I was using the dress form to block the top. There was no point blocking it flat after all the effort I had put into shaping it to not be a rectangle, so I steamed it on a dress form that was close to my measurements and then left it on the form until it was completely cool and dry. Blocking isn't set until it had fully cooled and dried. If you move the garment before then, you'll lose some or all of the shape you were trying to set it in.
I'm thinking about writing out this pattern for multiple sizes and trying to sell it on the internet, maybe on etsy. What say you all? Is this something you think knitters would be interested in making themselves? Do you think enough people would be willing to use the yarn info from my handspun to either spin their own or chose a suitable commercial yarn? I'm not sure how many knitter are out there who only use the recommended yarn for any project.
This pattern wouldn't be ready for sale until probably the fall, after my wedding and after my summer job. My plan would be to write it out for more than just S, M, L because last I checked, there are a lot more sizes than that. I'd like to go up to at least a 48" chest and offer petite (which mine is), regular, and long. That's a fair amount of time calculating.
Please post in the comments whether you think this would be a worthwhile pattern to write up for other folks. I've been thinking about getting some patterns published for years, and this might be a good place to start.
Monday, March 26, 2007
Getting our Stuff Together
lace shawl
2 wedding bands
2 origami bouquets
2 origami boutineers
table favors
centerpieces
bulletins
1974 Volkswagon "Thing"
Stuff we've finished:
lace shawl
engagement ring (that has to count for something, right?)
This isn't a problem yet, is it? We have almost 6 weeks left, and it's a small car. I guess for a little more perspective, I should look at...
Stuff we're not making for our wedding:
wedding dress (Thanks, Georgia!)
other people's clothes
other people's transportation
music
food
Wish that list was longer.
Saturday, March 03, 2007
Famous
I brought a copy to my vet and she said she would frame it and hang it in the office.
We were "discovered" at a monthly knitting night at which I had been working on the wedding shawl. A nice woman there was asking about the pattern of the shawl, and what the yarn was made out of, and asked if she could take a picture. I said sure, and next thing I knew she was asking for an interview. I expected two paragraphs as a side bar to another article by Linda, owner of Raveloe fibers, but was shocked and pleased to see the entire interview used and filling a whole page. I was actually interviewed by email, which is why there are no "ums" or sentence fragments or agregious gramatical errors.
Here is the finished shawl:
and when you compare it to the earlier pictures I posted of it in progress...You'll see the huge difference that blocking makes on knitted lace, both in how much the pattern opens up so that it can be seen, and in how much bigger the piece is once blocked! Both pictures show exactly the same area, the size of my scanner bed, and as you can see the blocked shawl is now too wide to fit.
I'm off to begin moving into the new apartment that Chris and I have rented for the three of us (Chris, Christopher, and I) to share after the wedding. I will be finished moving by the end of this month, but the boys will probably move more slowly and finish in May. I have a lot of books to lug up the stairs this afternoon.
Saturday, February 03, 2007
Working out, Babies, and Beer
Also in the weekend plans: I need to card the rest of my fine wools for the fleece study. We've been having a great time with it, and I love that so many of the other ladies in the class have found really great spinning and breed information on the net and have shared it. When we got together as a group to talk about what we had done so far (mostly washing and carding) someone (maybe Liz?) sheepishly mentioned that she had used her salad spinner to get as much water as possible out of each sample before laying it out to dry. Two or three others immediately piped up, "so did I!" If she hadn't said anything, would anyone else? or would we all have been too embarrassed to admit to it? I'm really learning how much good spinning relies on good fiber preparation, and will try to take pictures of my best methods to share. It's interesting too that many of us are coming to the same likes and dislikes of the various breeds, depending on how pleasant we find them to prepare and spin, as well as on the finished yarn. We all seem to love the California Variegated Mutant (CVM for short) and the Cormo. Interestingly enough, most of us were ultimately disappointed in the merino. Did we get a lackluster fleece, or is being the most famous not the same thing as being the best?
The wedding shawl is almost done. I've knitted the lace long enough and now need to knit the "cobweb frill" for the other end and then graft it on. Then of course I'll wash and block it and post some pictures. I've been fit in the wedding dress mock-up too, so it looks like I will have clothes on on May 5th.
My friend Mindy had her baby, Mason, early on the Monday morning after Thanksgiving. pretty much as soon as she told me she was pregnant I ran out and bought yarn for a classic Elizabeth Zimmerman baby surprise sweater. Mindy chose not to find out if she was having a boy or a girl, so I tried to pick out gender neutral colors that would match the nursery. One of the really sweet points of the baby surprise sweater instructions (and don't we all love Elizabeth Zimmerman's writing style?) is that she has you make buttonholes on both sides of the front, so that you can sew the buttons on the correct side after you know what the baby will be! Mindy brought the sweater in to the theatre this week so I could sew on the buttons, and Mason aka "Bootsie" was willing to model the sweater. This is a nice shot of Mindy, but not Bootsie's best photo, so take a look at happy proud Mommy.
Here's a much better picture of the little guy in new cardy. I'm glad it fits him now, when the snow has finally hit. Check out the non-gender-specific duck buttons! What a little cutie he is! I think he's almost doubled in size since the last time I saw him a few weeks ago! And of course I love him in his technicolor dream coat! I never believe a baby sweater will be big enough when I'm knitting it. Humans start out so tiny. I have to remember Bruce's wisdom: "If it fits a two liter bottle it's the right size for a baby."
Speaking of babies, my cousin Laura should be having hers any day now. I am planning a trip to the home brew shop today to buy ingredients I hope to brew tomorrow and would really like to invite my cousin-in-law Steve to come along. He was really interested when he found out that I'd been brewing, and I would love to share the process with him, but he's Laura's husband, and i think that if I have lured him away with beer when she goes into labor, there might be trouble. Right here in River City. So I'd better save the invite for the next batch when I'm just luring him away from feeding and diaper changes.
I'm trying to decide what kind of beer to make for my next batch. It's between a German Rauchbier, a Scotch Ale or a Scottish Ale. I've never had a Rauchbier, but have only read about them. They're made with a smoked malt and have a smokey character. It's thought that the first one brewed was a mistake--someone left the malt drying over the fire for too long! Scotch Ale and Scottish Ale are actually two different things. Scottish Ale, is well, Scottish, but Scotch Ale is actually Belgian! I didn't learn this until I've started reading brewing books and I'm sure I've had and enjoyed both, but now I don't know which is which! And of course I think that some beer companies label a Scottish Ale as Scotch, just to add to the confusion. Ah well, I may just take the recipe book with me and choose in the store. I'll definitely post about the results.
Wednesday, January 24, 2007
Happy Birthday to Mom!
So Happy Birthday Mom! Enjoy the red lace socks!
Wednesday, January 10, 2007
Fleece Study: Washing the Wool
I have to give big kudos to Donna for starting this whole thing and organizing it. I don't know how she initially found out about it, but she has discovered a much better way to do a fleece study, which is to start at Jacqueline Bland's website. Jackie does all the purchasing, splits up the fleeces into 1 ounce samples--all in little sandwich bags, and mails it out to you, complete with a binder full of information and worksheets for each breed represented. Had we done this on our own, the twelve of us in the group might have purchased 6 fleeces, and might still have been overwhelmed. By doing Jackie's study we will each get to work with samples of over 40 different fleeces, and did I mention the binder full of info?
Our plan is to work with all the information we can find in books and on the internet as well as learning from our own experience and from each other. I'm posting my process here as a resource to the group and anyone else who may find it helpful. I realized after our initial conversations that many experienced spinners have only worked with prepared roving and have never had to begin by washing or carding their wool, so I've included these photos to help illustrate that part of the process. Here's what I began with. At the top left is the box that contained the full study. Two larger bags of samples are still in it. To the right of the box is the third bag of samples and below the box is the binder. To the left on the hardwood floor are baggies of the first four samples we're working with, Cormo, Merino, Rambouillet, and Polwarth. The book is The Alden Amos Big Book of Handspinning an invaluable tome on the full subject of spinning. I find myself going back to this book every time someone in the group asks just about any spinning question. Also pictured is a digital kitchen scale which I used to weigh each sample before and after washing ( to determine just how much of my dirty fleece is dirt) and to weigh out the right amount of soap to use. That weird long white net type object is a bath poof that has had it's inner tie clipped. That was one of the brilliant suggestions from Jackie. If you take apart a poof you get a really long mesh tube, which is perfect for keeping small samples separate while washing.
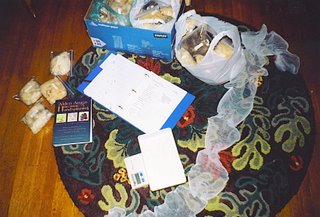
Here are the four samples ready for the first scour. I opened up each sample by pulling the wool apart and spreading out any tangled together locks. Then I stuffed then into the tube one by one with lots of space for each to move in and a knot in between the samples. I tied a piece of red yarn at one end to identify it as the beginning. I wrote down the order of the samples starting from the end with the red yarn so I could keep track of them throughout the process.
If I were washing a full fleece, I would have filled my bathtub half full of 110-120 F (43-49 C) water and scoured it in about 1lb batches with 4oz of orvus paste in each tub full, but since the samples here only add up to about 4oz of wool, I filled the tub to about a quarter full and used 2oz of orvus.
I did make one big mistake on this first batch of wool, which was that I underestimated the alkalinity of orvus paste. I added a significant quantity of washing soda, which made my scouring liquid much too alkali and damaged the wool. The washed wool broke easily when I held either end of a lock and gently pulled, and tended to break when I carded it, making for a lumpier preparation than I wanted. I washed later batches with just the orvus paste and got squeaky clean wool with no breaks.
The water temperature is important, as it has to be hot enough to melt the suint in the wool, but not so hot as to damage it. 110-120F is ideal. It's best if you use a thermometer, but in a pinch you can tell that you're in the ball park if you've used tap water hot enough that you can't keep your hand in it for very long.
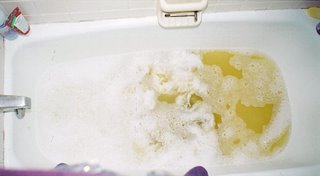
For the first scour, fill the tub with water, add the orvus paste (2oz for a quarter full tub, 4oz for half full) and drop your dirty wool in one end. Now slowly herd the wool from one end to the other with some sort of stick or pole. This is a slow herd to move the scouring liquid through the wool with as little agitation as possible so you don't accidentally felt it. It should take you about a minute to get to the other end of the tub. Herd back to the beginning and forth and back one more time. I started this batch at the right end of the tub and am moving it to the left. You can see that the water it has already passed through at the right is pretty filthy, while the left end of the tub is still clear. If you are washing a lot of wool (like a whole fleece) you can pull the first batch out and set it in an old strainer to drain while you run one more batch of wool through this water. After the second batch drain the tub. Since I was only washing one batch, I drained the tub right away while the wool was dripping in the strainer.
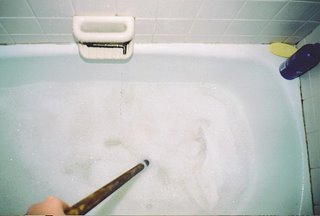
The second scour is just like the first scour, same amount of water and soap, same temperature, same herding with the stick. The only difference is that the water will be much cleaner because most of the dirt and suit came out in the first scour. If you are washing a whole fleece, you can put two batches of wool through the second scour bath too, but this time let the 2nd batch be the first so it gets a shot at the clean water.
The rinse water should be the same temperature as the two scours. You can do the herding again through the rinse. I have to admit I wandered off to make a cup of tea and let it sit still for a minute, then herded a bit, which worked out just fine. If doing a whole fleece you can put two batches through the rinse together.
Pull the clean wool out of the rinse water and let it drain. After it has drained you can grab all the knots together in one hand and fling the whole dripping mess around in big circles letting centrifugal force (actually a combination of centripetal force and straight line motion) remove most of the water from the wool. Either do this outdoors or leaning into your shower with the curtain most of the way closed to protect you and the bathroom from getting soaked. I laid out the clean wool on a towel on top of a drying rack in front of my radiator and it was dry within 24 hours.
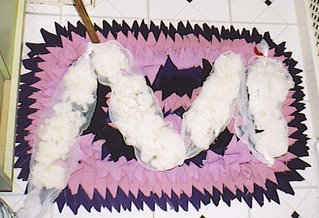
Check out how white the clean wool is. I laid it out on the same bathroom rug so you can see the color difference between dirty and clean.
This is all pretty much Alden Amos's method as laid out in his book. I've given more specific information about the brand and quantity of soap I used and how I dealt with the samples instead of a full fleece. He goes into much more detail about each step and why it's necessary, which is definitely worth reading.